Created page with "Eligibility – Is the form where data is entered to determine substantive and financial eligibility. It also allows checks for conflicts. It is the place most offices begin t..."
(15 intermediate revisions by the same user not shown)
Line 43:
Line 43:
# Know About – This drop-down allows your program to track how the applicant came to know about your services
# Know About – This drop-down allows your program to track how the applicant came to know about your services
# Has applicant checked on the Earned Income Tax Credit? – You can track the cases you ask about Earned Income Tax Credit by checking this box.
# Has applicant checked on the Earned Income Tax Credit? – You can track the cases you ask about Earned Income Tax Credit by checking this box.
# Notes box (appears below Date Note button) - Available for note taking that may be relevant to the eligibility process (e.g., they have medical bills that may be taken into consideration)
## Click on Date Note to enter the date and staff number so you can begin typing your notes
### Make sure you spell check your notes.
### If you need to enter canned notes or canned questions (Described later in this section), you can do so from here.
# Buttons across the bottom of the Applicant Info page:
## Review Callback - Reviews the associated call back record for this intake. However, if you did not start with Call Back, you will get a prompt that there is no related Callback but one will be created for you
## Review Online Intake – If you are using the Online Application System, you can review Online Intakes here (Described in Advanced Features Online Application System)
## Difficult Persons – The Difficult Person (DP) feature has a form that allows details about five occurrences to be entered about the difficult person (Described in Applicant Difficult People)
## Internal Msg. – Allows messages to be sent to other workers inside of the system (Described in Home Screen)
## Other Services – Allows you to enter an Other Service based on this eligibility record. You can do this if the applicant is not deemed eligible or if you provide other services not related to them or their issue. This could be giving them legal advice, referring them to another agency, etc. There is a requirement by LSC to track activities other than just cases. However, this might be useful even for offices that don’t have LSC funding. Other Services are described in more depth later in this document.
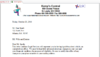
## Form Letters - Clicking this button will take you to Print Forms. You can choose a letter to send to the applicant, such as a letter of acceptance or refusal to take case[[File:FormLetter.png|200px|thumb|right|Form Letter image]]
### Choose Letter – There are two letters currently in the system, Eligibility Acceptance Letter and Refusal of Representation Letter (Note: You are free to add your own letters. This is explained in Administrator’s Functions Letters/Forms)
### Choose a Letterhead for your letter
### If you want to add text to the letter, click on the Add Text button.
#### Once you click on Add Text, a text box appears
#### You can type in your own text in the box or select from Canned Notes. Canned notes can also be added to the Notes on the Eligibility slip.
### After you enter text and/or add a canned note, select to add the text at the bottom or top of the letter[[File:LetterText.png|200px|thumb|right|Letter Text image]]
===Notes box ===
Appears below Date Note button - Available for note taking that may be relevant to the eligibility process (e.g., they have medical bills that may be taken into consideration)
# Click on Date Note to enter the date and staff number so you can begin typing your notes
## Make sure you spell check your notes.
## If you need to enter canned notes or canned questions (Described later in this section), you can do so from here.
=== Buttons across the bottom of the Applicant Info page ===
# Review Callback - Reviews the associated call back record for this intake. However, if you did not start with Call Back, you will get a prompt that there is no related Callback but one will be created for you
5) If you pick the Edit Full Letter button, you can edit any part of the letter, including the form letter text. Then press Generate Letter.
# Review Online Intake – If you are using the Online Application System, you can review Online Intakes here (Described in Advanced Features Online Application System)
# Difficult Persons – The Difficult Person (DP) feature has a form that allows details about five occurrences to be entered about the difficult person (Described in Applicant Difficult People)
# Internal Msg. – Allows messages to be sent to other workers inside of the system (Described in Home Screen)
# Other Services – Allows you to enter an Other Service based on this eligibility record. You can do this if the applicant is not deemed eligible or if you provide other services not related to them or their issue. This could be giving them legal advice, referring them to another agency, etc. There is a requirement by LSC to track activities other than just cases. However, this might be useful even for offices that don’t have LSC funding. Other Services are described in more depth later in this document.
6) You will get a prompt asking if you want to Save the Full Text of the Letter in your Notes
# Form Letters - Clicking this button will take you to Print Forms. You can choose a letter to send to the applicant, such as a letter of acceptance or refusal to take case[[File:FormLetter.png|100px|thumb|right|Form Letter image]]
7) Once you select Yes or No, you will get a print preview of your letter
## Choose Letter – There are two letters currently in the system, Eligibility Acceptance Letter and Refusal of Representation Letter (Note: You are free to add your own letters. This is explained in Administrator’s Functions Letters/Forms)
## Choose a Letterhead for your letter
## If you want to add text to the letter, click on the Add Text button.
### Once you click on Add Text, a text box appears
8) You can then print out your letter and close this form
### You can type in your own text in the box or select from Canned Notes. Canned notes can also be added to the Notes on the Eligibility slip.
9) Notice that the text of the letter now appears in your notes
## After you enter text and/or add a canned note, select to add the text at the bottom or top of the letter[[File:LetterText.png|100px|thumb|right|Letter Text image]]
## If you pick the Edit Full Letter button, you can edit any part of the letter, including the form letter text. Then press Generate Letter.[[File:GenerateLetter.png|100px|thumb|right|Generate Letter image]]
##You will get a prompt asking if you want to Save the Full Text of the Letter in your Notes
vii) Canned Notes
## Once you select Yes or No, you will get a print preview of your letter[[File:LetterPrintPreview.png|100px|thumb|right|Print Preview image]]
1) Often you’re afraid that you’ll forget to give one piece of information to an applicant/client or forget to ask certain questions. This can occur if you’ve helped several people with the same issue during a day. Canned notes can help.
##You can then print out your letter and close this form
## Notice that the text of the letter now appears in your notes[[File:LetterInNotes.png|100px|thumb|right|Letter In Notes image]]
2) You can choose from both a list of Questions and Canned Notes to include in your case notes. You then use these questions and notes to:
# Canned Notes
i) Give the applicant/client a quick summary of the things you discussed, insuring that you covered all the issues.
## Often you’re afraid that you’ll forget to give one piece of information to an applicant/client or forget to ask certain questions. This can occur if you’ve helped several people with the same issue during a day. Canned notes can help.
ii) Record what you told the client in case the question arises in the future.
## You can choose from both a list of Questions and Canned Notes to include in your case notes. You then use these questions and notes to:
iii) Jog your memory about advice to be given or questions to be asked.
### Give the applicant/client a quick summary of the things you discussed, insuring that you covered all the issues.
iv) Canned notes can be dropped into the form letters so that the applicant/client also gets a written record of the advice that was given.
### Record what you told the client in case the question arises in the future.
3) You can edit the Canned Note, in the note or letter so it more closely fits the applicant’s situation.
### Jog your memory about advice to be given or questions to be asked.
4) To add new or modify existing Canned Notes, see instructions later under the Administrator section.
### Canned notes can be dropped into the form letters so that the applicant/client also gets a written record of the advice that was given.
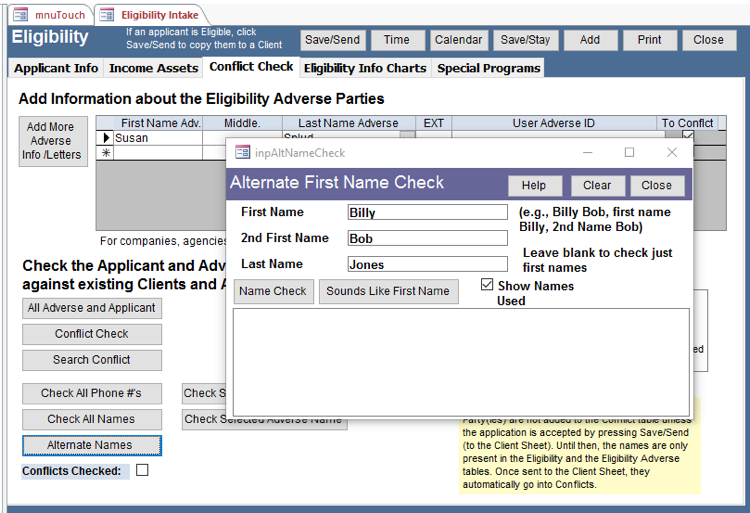
e) Conflict Check tab – This tab allows you to perform different conflict checks on the applicant to ensure that the program does not have a conflict with this applicant/client. A Conflict means the applicant was an adverse party in another case or the adverse party in this case is one of your office’s clients.
## You can edit the Canned Note, in the note or letter so it more closely fits the applicant’s situation.
## To add new or modify existing Canned Notes, see instructions later under the Administrator section.
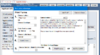
== Conflict Check tab ==
1) Adverse Name – Name of the person against the applicant. If it is an agency or company, enter their name in the last name field or you may use the drop-down box for a common list; this list can be added to for common agencies, e.g. Social Security Administration
[[File:ConflictCheckTab.png]]
2) The Add More Adverse Info / Letters button displays a form allowing a lot more information to be entered about the adverse party. This additional information can be useful when needing to have a Litigation screen.
This tab allows you to perform different conflict checks on the applicant to ensure that the program does not have a conflict with this applicant/client. A Conflict means the applicant was an adverse party in another case or the adverse party in this case is one of your office’s clients.
3) Conflict Check button – Takes you to a screen where you can perform a 2-way, 2-way prior, 4-way, or 6-way conflict check. The instructions at the bottom of the screen tell you what each of the checks do.
# Adverse Name – Name of the person against the applicant. If it is an agency or company, enter their name in the last name field or you may use the drop-down box for a common list; this list can be added to for common agencies, e.g. Social Security Administration
# The Add More Adverse Info / Letters button displays a form allowing a lot more information to be entered about the adverse party. This additional information can be useful when needing to have a Litigation screen.[[File:EligibilityAdverse.png|100px|thumb|right|Eligibility Adverse Details]]
# Conflict Check button – Takes you to a screen where you can perform a 2-way, 2-way prior, 4-way, or 6-way conflict check. [[File:ConflictCheck.png|100px|thumb|right|Conflict Check Screen]]The instructions at the bottom of the screen tell you what each of the checks do.
## 2-Way – Checks if client has been an adverse or adverse has been client
i) 2-Way – Checks if client has been an adverse or adverse has been client
## 2-Way Prior – Checks if client has been a client or adverse has been an adverse
ii) 2-Way Prior – Checks if client has been a client or adverse has been an adverse
## 4-Way – Include the 2-Way and 2-Way Prior
iii) 4-Way – Include the 2-Way and 2-Way Prior
## 6-Way – The 6-Way includes the 2-Way and 4-Way but also checks if the spouse or non-adverse has been a client or adverse
iv) 6-Way – The 6-Way includes the 2-Way and 4-Way but also checks if the spouse or non-adverse has been a client or adverse
## Several programs hide the 2-way, 2-way prior, and 4-way buttons, just to make sure their staff members check for everything
v) Several programs hide the 2-way, 2-way prior, and 4-way buttons, just to make sure their staff members check for everything
# Search Conflict button – A normal search screen that allows you to search for a particular person’s name in the conflict database
4) Search Conflict button – A normal search screen that allows you to search for a particular person’s name in the conflict database
# Check All Phone #’s and Check All Names’ buttons are search tools that look for applicants/clients based on phone numbers or full name (Described in Search/Edit Menu Choices All People and All Phones)
5) Check All Phone #’s and Check All Names’ buttons are search tools that look for applicants/clients based on phone numbers or full name (Described in Search/Edit Menu Choices All People and All Phones)
# Alternate Names button – A search process for error checking matches for first names and diminutive first names (e.g., Bob checks for Robbie, Robert, Rob, etc.)[[File:AlternateName.png]]
6) Alternate Names button – A search process for error checking matches for first names and diminutive first names (e.g., Bob checks for Robbie, Robert, Rob, etc.)
## First Name and 2nd First Name checks for different first names such as Rob, Robbie, Bob, etc.
## Sounds Like First Name – This uses the Soundex Formula to find first names that sound the same (e.g., Laura finds Lara, Laurie, Larry, etc.)
## Last Name – Type in a last name or leave this field blank to just check for first names
## If you check the Show Names Used checkbox, the box will list the names that were used for checking.
# Add to Conflicts button – Allows you to add the adverse party’s name and the applicant/client’s name to the Conflict table (this is only necessary if you do not plan to proceed beyond the Eligibility slip)
i) First Name and 2nd First Name checks for different first names such as Rob, Robbie, Bob, etc.
#When you put in an organization, group or company as an adverse party or a client, it is essential you follow these instructions to insure correct conflict checking.
ii) Sounds Like First Name – This uses the Soundex Formula to find first names that sound the same (e.g., Laura finds Lara, Laurie, Larry, etc.)
## If entering the organization as a Client be sure to put the full name of the organization in the Last name field and Org in the First name field.
iii) Last Name – Type in a last name or leave this field blank to just check for first names
## If entering the organization as an Adverse Party, be sure to put the full name of the organization in the Last name of the Adverse Party and Org as the First name of the Adverse Party.
iv) If you check the Show Names Used checkbox, the box will list the names that were used for checking.
## It is important to put the full name of the organization in the last name because it would be hard to anticipate how people would enter the name otherwise. For example, Joe’s Auto Parts, Inc. might be entered:
7) Add to Conflicts button – Allows you to add the adverse party’s name and the applicant/client’s name to the Conflict table (this is only necessary if you do not plan to proceed beyond the Eligibility slip)
{|
|
|First Name
|Last Name
8) When you put in an organization, group or company as an adverse party or a client, it is essential you follow these instructions to insure correct conflict checking.
|-
i) If entering the organization as a Client be sure to put the full name of the organization in the Last name field and Org in the First name field.
|
ii) If entering the organization as an Adverse Party, be sure to put the full name of the organization in the Last name of the Adverse Party and Org as the First name of the Adverse Party.
|Joe’s
iii) It is important to put the full name of the organization in the last name because it would be hard to anticipate how people would enter the name otherwise. For example, Joe’s Auto Parts, Inc. might be entered:
|Auto Parts, Inc.
|-
Joe’s Auto Parts, Inc.
|
Joe’s Auto Parts, Inc.
|Joe’s Auto
Joe’s Auto Parts,Inc.
|Parts, Inc.
iv) It is important that you put some sort of place holder in the first name. In my example, I would add Org for a first name for Joe’s Auto Parts, Inc. (Which stands for organization).
|-
|
Org Joe’s Auto Parts, Inc.
|Joe’s Auto Parts,
|Inc.
|}
It is important that you put some sort of place holder in the first name. In my example, I would add Org for a first name for Joe’s Auto Parts, Inc. (Which stands for organization).
{|
|
|First Name
|Last Name
|-
|
|Org
|Joe's Auto Parts, Inc.
|}
The Org (or Company or NA, etc.) is necessary as a place holder since there is an error check that looks to find a first name for adverse party and if there isn’t one, shows an error. This is easily put into your existing data with a query.
The Org (or Company or NA, etc.) is necessary as a place holder since there is an error check that looks to find a first name for adverse party and if there isn’t one, shows an error. This is easily put into your existing data with a query.
9) Once completed, be sure to check the box that says Conflicts Checked.
Once completed, be sure to check the box that says Conflicts Checked.
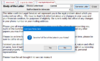
== Income Assets Tab ==
[[File:IncomeAssets.png]]
# Hourly $ – Easily calculates the weekly income for a person by typing in an hourly rate in the Hourly $ box and hours per week in the WklyHrs box. The resulting weekly total will be shown in the Total $ field. You can send that to the Income Grid using the Send to Grid button
# Calculator – If you need one
# Refresh Totals button – If you change figures in your hourly or weekly hours, click on this button to recalculate the total. This generally is not necessary.
===Income Grid===
# Use the drop down box to select the Income Source
# Include either the weekly, every two weeks, twice a month, monthly, or yearly income only. Note this in the Period drop down.
# Prime will automatically calculate the other required fields for you
# The totals for monthly and yearly income are shown below those columns
===Assets Grid===
# Use the drop-down box to select the Asset Name.
# Include the Asset Value according to your program’s guidelines (Prime does error checking on these, so that intake workers do not forget to ask about assets and respond with the appropriate values)
# The total values are shown below the value columns
===Expenses===
Captures the applicant’s eligible expenses, either monthly, yearly, weekly, every two weeks or twice a month. If you have checked the Ext. Elig. 125-200% box, you may use these expenses to justify the exception. The expenses are used to reduce the income for the Net Poverty Percent Figure (which uses total income minus expenses).
# If the applicant meets the LSC Exception rule regarding their income, check the Ext. Elig. 125-200% box
# If the applicant is receiving other government benefits such as Food Stamps or SSI, check the Means test by Government Agency box. This means you don’t need to do an income – asset test for LSC. You can choose the Agency Used in the pull down box.
# Asked about Future Income, check this box if you asked. You can record the results in Notes.
# Poverty % – This button will take the number of people in the household (Adults + Children) and compare it against the total income for the household and give you the % of poverty that the household fits within (based on the amounts entered into the Eligibility Info Charts discussed on page 43).
# Net (-Expenses) – In calculating eligibility, you have two poverty percent figures, one that shows the poverty level of total income (Poverty %) and one that takes into account entered expenses (Net (-Expenses)), showing the poverty level of total income minus (-) expenses. The second net value will be lower if you entered expenses.
# LSC Eligible – Check this box if the person meets all LSC requirements. Note: Checking this box also does error checking on your form, so you might use it even if you aren’t funded by LSC. A message pops up listing errors if there are any. It checks for:
## Income sources without amounts
## Assets without amounts
## First and last name entered
## Adults and children have been input
## Whether conflicts have been checked
## Whether citizenship has been checked
# Program Eligible – Perhaps the applicant is not LSC Eligible, but does meet some other eligibility requirements under a different grant (State Monies?). Check this box to indicate that they are still eligible for your program’s services.
# Rejected Reason – If the person is to be rejected at this point, you may use the dropdown box to indicate the reason for the rejection.
f) Income Assets Tab
== Eligibility Info Charts tab ==
1) Hourly $ – Easily calculates the weekly income for a person by typing in an hourly rate in the Hourly $ box and hours per week in the WklyHrs box. The resulting weekly total will be shown in the Total $ field. You can send that to the Income Grid using the Send to Grid button
This shows your program’s eligibility guidelines based upon the number of people in the household. These charts must be modified each year new guidelines are put out. Go to the Administrator section to see how this is done.
2) Calculator – If you need one
3) Refresh Totals button – If you change figures in your hourly or weekly hours, click on this button to recalculate the total. This generally is not necessary.
4) Income Grid
i) Use the drop down box to select the Income Source
ii) Include either the weekly, every two weeks, twice a month, monthly, or yearly income only. Note this in the Period drop down.
iii) Prime will automatically calculate the other required fields for you
iv) The totals for monthly and yearly income are shown below those columns
5) Assets Grid
i) Use the drop-down box to select the Asset Name.
ii) Include the Asset Value according to your program’s guidelines (Prime does error checking on these, so that intake workers do not forget to ask about assets and respond with the appropriate values)
iii) The total values are shown below the value columns
6) Expenses – Captures the applicant’s eligible expenses, either monthly, yearly, weekly, every two weeks or twice a month. If you have checked the Ext. Elig. 125-200% box, you may use these expenses to justify the exception. The expenses are used to reduce the income for the Net Poverty Percent Figure (which uses total income minus expenses).
7) If the applicant meets the LSC Exception rule regarding their income, check the Ext. Elig. 125-200% box
8) If the applicant is receiving other government benefits such as Food Stamps or SSI, check the Means test by Government Agency box. This means you don’t need to do an income – asset test for LSC. You can choose the Agency Used in the pull down box.
9) Asked about Future Income, check this box if you asked. You can record the results in Notes.
10) Poverty % – This button will take the number of people in the household (Adults + Children) and compare it against the total income for the household and give you the % of poverty that the household fits within (based on the amounts entered into the Eligibility Info Charts discussed on page 43).
11) Net (-Expenses) – In calculating eligibility, you have two poverty percent figures, one that shows the poverty level of total income (Poverty %) and one that takes into account entered expenses (Net (-Expenses)), showing the poverty level of total income minus (-) expenses. The second net value will be lower if you entered expenses.
12) LSC Eligible – Check this box if the person meets all LSC requirements. Note: Checking this box also does error checking on your form, so you might use it even if you aren’t funded by LSC. A message pops up listing errors if there are any. It checks for:
i) Income sources without amounts
ii) Assets without amounts
iii) First and last name entered
iv) Adults and children have been input
v) Whether conflicts have been checked
vi) Whether citizenship has been checked
13) Program Eligible – Perhaps the applicant is not LSC Eligible, but does meet some other eligibility requirements under a different grant (State Monies?). Check this box to indicate that they are still eligible for your program’s services.
14) Rejected Reason – If the person is to be rejected at this point, you may use the dropdown box to indicate the reason for the rejection.
g) Eligibility Info Charts tab – This shows your program’s eligibility guidelines based upon the number of people in the household. These charts must be modified each year new guidelines are put out. Go to the Administrator section to see how this is done.
Note: Since your Eligibility Slip calculates the percentage of poverty of the applicant, it isn’t necessary to put in other tables that reference poverty level, such as 200% poverty, etc. Put in any funding guidelines that are INDEPENDENT of the poverty level.
Note: Since your Eligibility Slip calculates the percentage of poverty of the applicant, it isn’t necessary to put in other tables that reference poverty level, such as 200% poverty, etc. Put in any funding guidelines that are INDEPENDENT of the poverty level.
h) Special Programs allow you to gather additional information needed not on the Eligibility sheet. For example, you might have a Special Program that would apply specifically to Veterans. If the applicant wasn’t eligible under your normal guidelines, you could pop this sheet up and see if they fit under your Veteran’s program guidelines.
== Special Programs ==
Allow you to gather additional information needed not on the Eligibility sheet. For example, you might have a Special Program that would apply specifically to Veterans. If the applicant wasn’t eligible under your normal guidelines, you could pop this sheet up and see if they fit under your Veteran’s program guidelines.
To build a special program you would need our assistance to construct a table to hold the information and an intake sheet to input it. Special Programs are covered more in depth under Advanced Features.
To build a special program you would need our assistance to construct a table to hold the information and an intake sheet to input it. Special Programs are covered more in depth under Advanced Features.
== Buttons across the top of the Eligibility form ==
i) Buttons across the top of the Eligibility form
# Save/Send – Saves the Eligibility Slip and copies information to a new Client Intake.
1) Save/Send – Saves the Eligibility Slip and copies information to a new Client Intake.
# Calendar – Creates a calendar event for this applicant, described in scheduling.
2) Calendar – Creates a calendar event for this applicant, described in scheduling.
# Save/Stay – Save this information and stay on this form.
3) Save/Stay – Save this information and stay on this form.
# Add – Saves the existing slip and opens a new, blank Eligibility slip
4) Add – Saves the existing slip and opens a new, blank Eligibility slip
# Print – Print this form and the information in it
5) Print – Print this form and the information in it
# Time – This button will take you to a Time Keeping form, wherein you can track the time spent on the Intake (Described in Time Keeping)
6) Time – This button will take you to a Time Keeping form, wherein you can track the time spent on the Intake (Described in Time Keeping)
# Callback – Opens the Callback slip related to this Eligibility Slip. If one doesn’t exist, it creates one using the information on the Eligibility Slip. Callback is discussed in its own section. Press Close on the Callback slip to return to Eligibility.
7) Callback – Opens the Callback slip related to this Eligibility Slip. If one doesn’t exist, it creates one using the information on the Eligibility Slip. Callback is discussed in its own section. Press Close on the Callback slip to return to Eligibility.
# Close – Saves the information and returns you to the menu system
8) Close – Saves the information and returns you to the menu system
Latest revision as of 15:02, 18 August 2017
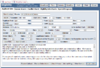
Eligibility – Is the form where data is entered to determine substantive and financial eligibility. It also allows checks for conflicts. It is the place most offices begin their intake.
The information gathered includes
The number of people in the household
The total income
The total assets and
The monthly expenses.
Eligibility allows you to reject a client quickly
If they do not meet the eligibility guidelines used by your program.
To enter a new Eligibility record
Go to Add Applicant Eligibility
Applicant Info tab
Required fields are marked with an (*)
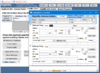
Client Lookup – Allows you to check to see if an applicant is listed as an open or closed client in Prime.Client Lookup image
Enter one or more letters of the last name OR “last name, first name” and hit Enter
If their name is currently in the system as a client, it will appear in the drop-down. You can:
Review Existing opens a summary so you can check if this is the same client;
Open Existing – If it is the same client and the same issue you can open the ongoing case and talk to the client about it.
Create New – Allows you to copy information from an old case into a new eligibility slip so you can start a new case.
Pcode (Problem Code) - Drop down box of problem codes used to designate the primary legal issue in the case.
Auto # - This will use automatic numbering to assign a case number for this applicant/client
Start Time - – Allows you to track time spent on entering this Eligibility slip (Note: You must click on Auto # to get a case number before starting time on this slip)
Staff – Defaults to the staff person logged in (can be changed)
DOpen (Date Open) – Defaults to the current date (can be changed)
Applicants Name - First Name and Last Name have defaults in them for error checking. Replace those names as appropriate for the applicant; Middle Name and Ext (Sr., Jr., II, etc.) can be included. Note about entering Last Names: If a last name contains apostrophes, spaces or dashes such as O’Connell, De La Gardo, or Smith-Jones, this can affect your search results. You may want to set a policy for entry or use the wild card method when searching for such names. The wild card method is explained in depth later in the Search section of this manual.
Spouse or Non Adverse Name – Enter the name of a spouse or non adverse party to the case if needed.
Optional - Enter the Address, City, State, Zip Code, County, and Phone Number of applicant (Note: You can enter a Zip Code and click on the City/State button and the City, State, and County fields will populate)
Birth date - Birth date of the applicant. This helps in conflict checking.
Gender – Enter the gender of the applicant
Adults and Children - Allows you to tell the system how many people are in the household for eligibility determination
Citizen Check – If you have checked whether the person meets your program’s citizenship requirements, check this box
Status – Select the appropriate citizenship status from this pull down list
Legal Issue County – This field tracks the county where the legal issue is.
Office – Defaults to the office number of the person logged in; change if necessary
Unit – Select a unit if necessary (Described in Staff Member Setup)
Know About – This drop-down allows your program to track how the applicant came to know about your services
Has applicant checked on the Earned Income Tax Credit? – You can track the cases you ask about Earned Income Tax Credit by checking this box.
Notes box
Appears below Date Note button - Available for note taking that may be relevant to the eligibility process (e.g., they have medical bills that may be taken into consideration)
Click on Date Note to enter the date and staff number so you can begin typing your notes
Make sure you spell check your notes.
If you need to enter canned notes or canned questions (Described later in this section), you can do so from here.
Buttons across the bottom of the Applicant Info page
Review Callback - Reviews the associated call back record for this intake. However, if you did not start with Call Back, you will get a prompt that there is no related Callback but one will be created for you
Review Online Intake – If you are using the Online Application System, you can review Online Intakes here (Described in Advanced Features Online Application System)
Difficult Persons – The Difficult Person (DP) feature has a form that allows details about five occurrences to be entered about the difficult person (Described in Applicant Difficult People)
Internal Msg. – Allows messages to be sent to other workers inside of the system (Described in Home Screen)
Other Services – Allows you to enter an Other Service based on this eligibility record. You can do this if the applicant is not deemed eligible or if you provide other services not related to them or their issue. This could be giving them legal advice, referring them to another agency, etc. There is a requirement by LSC to track activities other than just cases. However, this might be useful even for offices that don’t have LSC funding. Other Services are described in more depth later in this document.
Form Letters - Clicking this button will take you to Print Forms. You can choose a letter to send to the applicant, such as a letter of acceptance or refusal to take caseForm Letter image
Choose Letter – There are two letters currently in the system, Eligibility Acceptance Letter and Refusal of Representation Letter (Note: You are free to add your own letters. This is explained in Administrator’s Functions Letters/Forms)
Choose a Letterhead for your letter
If you want to add text to the letter, click on the Add Text button.
Once you click on Add Text, a text box appears
You can type in your own text in the box or select from Canned Notes. Canned notes can also be added to the Notes on the Eligibility slip.
After you enter text and/or add a canned note, select to add the text at the bottom or top of the letterLetter Text image
If you pick the Edit Full Letter button, you can edit any part of the letter, including the form letter text. Then press Generate Letter.Generate Letter image
You will get a prompt asking if you want to Save the Full Text of the Letter in your Notes
Once you select Yes or No, you will get a print preview of your letterPrint Preview image
You can then print out your letter and close this form
Notice that the text of the letter now appears in your notesLetter In Notes image
Canned Notes
Often you’re afraid that you’ll forget to give one piece of information to an applicant/client or forget to ask certain questions. This can occur if you’ve helped several people with the same issue during a day. Canned notes can help.
You can choose from both a list of Questions and Canned Notes to include in your case notes. You then use these questions and notes to:
Give the applicant/client a quick summary of the things you discussed, insuring that you covered all the issues.
Record what you told the client in case the question arises in the future.
Jog your memory about advice to be given or questions to be asked.
Canned notes can be dropped into the form letters so that the applicant/client also gets a written record of the advice that was given.
You can edit the Canned Note, in the note or letter so it more closely fits the applicant’s situation.
To add new or modify existing Canned Notes, see instructions later under the Administrator section.
Conflict Check tab
This tab allows you to perform different conflict checks on the applicant to ensure that the program does not have a conflict with this applicant/client. A Conflict means the applicant was an adverse party in another case or the adverse party in this case is one of your office’s clients.
Adverse Name – Name of the person against the applicant. If it is an agency or company, enter their name in the last name field or you may use the drop-down box for a common list; this list can be added to for common agencies, e.g. Social Security Administration
The Add More Adverse Info / Letters button displays a form allowing a lot more information to be entered about the adverse party. This additional information can be useful when needing to have a Litigation screen.Eligibility Adverse Details
Conflict Check button – Takes you to a screen where you can perform a 2-way, 2-way prior, 4-way, or 6-way conflict check. Conflict Check ScreenThe instructions at the bottom of the screen tell you what each of the checks do.
2-Way – Checks if client has been an adverse or adverse has been client
2-Way Prior – Checks if client has been a client or adverse has been an adverse
4-Way – Include the 2-Way and 2-Way Prior
6-Way – The 6-Way includes the 2-Way and 4-Way but also checks if the spouse or non-adverse has been a client or adverse
Several programs hide the 2-way, 2-way prior, and 4-way buttons, just to make sure their staff members check for everything
Search Conflict button – A normal search screen that allows you to search for a particular person’s name in the conflict database
Check All Phone #’s and Check All Names’ buttons are search tools that look for applicants/clients based on phone numbers or full name (Described in Search/Edit Menu Choices All People and All Phones)
Alternate Names button – A search process for error checking matches for first names and diminutive first names (e.g., Bob checks for Robbie, Robert, Rob, etc.)
First Name and 2nd First Name checks for different first names such as Rob, Robbie, Bob, etc.
Sounds Like First Name – This uses the Soundex Formula to find first names that sound the same (e.g., Laura finds Lara, Laurie, Larry, etc.)
Last Name – Type in a last name or leave this field blank to just check for first names
If you check the Show Names Used checkbox, the box will list the names that were used for checking.
Add to Conflicts button – Allows you to add the adverse party’s name and the applicant/client’s name to the Conflict table (this is only necessary if you do not plan to proceed beyond the Eligibility slip)
When you put in an organization, group or company as an adverse party or a client, it is essential you follow these instructions to insure correct conflict checking.
If entering the organization as a Client be sure to put the full name of the organization in the Last name field and Org in the First name field.
If entering the organization as an Adverse Party, be sure to put the full name of the organization in the Last name of the Adverse Party and Org as the First name of the Adverse Party.
It is important to put the full name of the organization in the last name because it would be hard to anticipate how people would enter the name otherwise. For example, Joe’s Auto Parts, Inc. might be entered:
First Name
Last Name
Joe’s
Auto Parts, Inc.
Joe’s Auto
Parts, Inc.
Joe’s Auto Parts,
Inc.
It is important that you put some sort of place holder in the first name. In my example, I would add Org for a first name for Joe’s Auto Parts, Inc. (Which stands for organization).
First Name
Last Name
Org
Joe's Auto Parts, Inc.
The Org (or Company or NA, etc.) is necessary as a place holder since there is an error check that looks to find a first name for adverse party and if there isn’t one, shows an error. This is easily put into your existing data with a query.
Once completed, be sure to check the box that says Conflicts Checked.
Income Assets Tab
Hourly $ – Easily calculates the weekly income for a person by typing in an hourly rate in the Hourly $ box and hours per week in the WklyHrs box. The resulting weekly total will be shown in the Total $ field. You can send that to the Income Grid using the Send to Grid button
Calculator – If you need one
Refresh Totals button – If you change figures in your hourly or weekly hours, click on this button to recalculate the total. This generally is not necessary.
Income Grid
Use the drop down box to select the Income Source
Include either the weekly, every two weeks, twice a month, monthly, or yearly income only. Note this in the Period drop down.
Prime will automatically calculate the other required fields for you
The totals for monthly and yearly income are shown below those columns
Assets Grid
Use the drop-down box to select the Asset Name.
Include the Asset Value according to your program’s guidelines (Prime does error checking on these, so that intake workers do not forget to ask about assets and respond with the appropriate values)
The total values are shown below the value columns
Expenses
Captures the applicant’s eligible expenses, either monthly, yearly, weekly, every two weeks or twice a month. If you have checked the Ext. Elig. 125-200% box, you may use these expenses to justify the exception. The expenses are used to reduce the income for the Net Poverty Percent Figure (which uses total income minus expenses).
If the applicant meets the LSC Exception rule regarding their income, check the Ext. Elig. 125-200% box
If the applicant is receiving other government benefits such as Food Stamps or SSI, check the Means test by Government Agency box. This means you don’t need to do an income – asset test for LSC. You can choose the Agency Used in the pull down box.
Asked about Future Income, check this box if you asked. You can record the results in Notes.
Poverty % – This button will take the number of people in the household (Adults + Children) and compare it against the total income for the household and give you the % of poverty that the household fits within (based on the amounts entered into the Eligibility Info Charts discussed on page 43).
Net (-Expenses) – In calculating eligibility, you have two poverty percent figures, one that shows the poverty level of total income (Poverty %) and one that takes into account entered expenses (Net (-Expenses)), showing the poverty level of total income minus (-) expenses. The second net value will be lower if you entered expenses.
LSC Eligible – Check this box if the person meets all LSC requirements. Note: Checking this box also does error checking on your form, so you might use it even if you aren’t funded by LSC. A message pops up listing errors if there are any. It checks for:
Income sources without amounts
Assets without amounts
First and last name entered
Adults and children have been input
Whether conflicts have been checked
Whether citizenship has been checked
Program Eligible – Perhaps the applicant is not LSC Eligible, but does meet some other eligibility requirements under a different grant (State Monies?). Check this box to indicate that they are still eligible for your program’s services.
Rejected Reason – If the person is to be rejected at this point, you may use the dropdown box to indicate the reason for the rejection.
Eligibility Info Charts tab
This shows your program’s eligibility guidelines based upon the number of people in the household. These charts must be modified each year new guidelines are put out. Go to the Administrator section to see how this is done.
Note: Since your Eligibility Slip calculates the percentage of poverty of the applicant, it isn’t necessary to put in other tables that reference poverty level, such as 200% poverty, etc. Put in any funding guidelines that are INDEPENDENT of the poverty level.
Special Programs
Allow you to gather additional information needed not on the Eligibility sheet. For example, you might have a Special Program that would apply specifically to Veterans. If the applicant wasn’t eligible under your normal guidelines, you could pop this sheet up and see if they fit under your Veteran’s program guidelines.
To build a special program you would need our assistance to construct a table to hold the information and an intake sheet to input it. Special Programs are covered more in depth under Advanced Features.
Buttons across the top of the Eligibility form
Save/Send – Saves the Eligibility Slip and copies information to a new Client Intake.
Calendar – Creates a calendar event for this applicant, described in scheduling.
Save/Stay – Save this information and stay on this form.
Add – Saves the existing slip and opens a new, blank Eligibility slip
Print – Print this form and the information in it
Time – This button will take you to a Time Keeping form, wherein you can track the time spent on the Intake (Described in Time Keeping)
Callback – Opens the Callback slip related to this Eligibility Slip. If one doesn’t exist, it creates one using the information on the Eligibility Slip. Callback is discussed in its own section. Press Close on the Callback slip to return to Eligibility.
Close – Saves the information and returns you to the menu system


 This tab allows you to perform different conflict checks on the applicant to ensure that the program does not have a conflict with this applicant/client. A Conflict means the applicant was an adverse party in another case or the adverse party in this case is one of your office’s clients.