Volunteer Web Portal 16: Difference between revisions
Jspenceratty (talk | contribs) |
Jspenceratty (talk | contribs) |
||
| Line 271: | Line 271: | ||
====View Open Cases==== | ====View Open Cases==== | ||
If you want to see what cases are shown as waiting on the Portal, open the Client Search Screen (Menu: SearchClientClients). In the “Search Field” dropdown box, select “Case Type”. In the “Word or #” box, type in “W” (obviously without the quotes). Review the list. For any item in the list that does not have a date closed, the case should be shown on the Portal. An example of such a list is shown in Figure 50. | If you want to see what cases are shown as waiting on the Portal, open the Client Search Screen (Menu: SearchClientClients). In the “Search Field” dropdown box, select “Case Type”. In the “Word or #” box, type in “W” (obviously without the quotes). Review the list. For any item in the list that does not have a date closed, the case should be shown on the Portal. An example of such a list is shown in Figure 50. | ||
[[File: | [[File:PBI16V2image090.png|400px]] | ||
Figure 50 - Search Screen Showing Waiting Cases | Figure 50 - Search Screen Showing Waiting Cases | ||
Revision as of 20:31, 19 December 2017
Introduction
Version 16 of the Private Bar Portal improves on the previous versions by using the latest web technology and the new features of Prime version 16. The Portal allows attorneys to interact with your Prime system with only a web browser and Internet access. Version 16 of the Portal is available as an optional, add-on component. It is exclusively available for use with Prime 16 installations. This is the list of enhancements made to the Private Bar Portal. They are discussed more in detail later in this document. For Version 16 of the Portal, generally:
- 1. A video help system.
- 2. A graphics-rich dashboard.
- 3. An easier-to-use, redesigned menu interface.
- 4. File upload, allowing the selection of multiple files, and file sizes larger than 4 Mb.
- 5. More informative email notifications.
For the second iteration of Version 16 of the Portal (Private Bar Portal 16 v 2):
- 1. Mobile-friendly responsiveness
- 2. Simplified waiting case screening
- 3. Document download MIME mapping
Enhancements in Private Bar Portal 16 version 2
Mobile-friendly Responsiveness
Several new enhancements have been made in version 2. The first, major enhancement is a redesign of the website for responsiveness. Every page in the website has been modified to enhance user viewing whether in a desktop or mobile environment. Each web page will change its layout depending on the size of the screen available. Although there are some controls in some pages that cannot be adequately displayed in very small screens, the responsive design makes the use of those controls easier in smaller screens. Please note that as a result of its responsiveness, the images of web pages shown herein are representative only. Each page may appear slightly different based on the dimensions of the screen available. A page viewed on a small mobile device will look remarkably different from the same page viewed on a full-sized, desktop monitor.
Waiting Case Screening
Waiting cases were previously screened using a three-phase process (review of a basic note about the case, review of conflict information, review of client information) with each phase being displayed in a separate web page. Each phase is now taken care of in a single, responsive page, making the process simpler to manage with fewer web pages.
Document Download MIME Mapping
Downloaded documents are now put through a MIME mapping system. This helps the receiving device know the type of the document and what program or interface it should provide to open or display that document. On mobile devices, this can help by displaying the document within the web interface for easy use.
Enhancements
Video Help System
Within the menu of the Portal, attorneys have the ability to access a new video-based help system. The menu item is shown in Figure 1 and the actual web help system page is shown in Figure 2.

Figure 1 - Help Menu Item
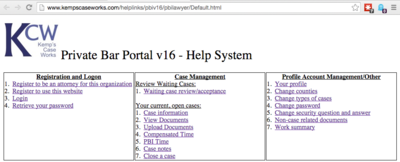

Figure 2 - PBI Lawyer Video Help System When an attorney clicks on a link in the Portal Help System, a video shows them how to use the feature. Staff have a similar video help system available to them, shown in Figure 3.
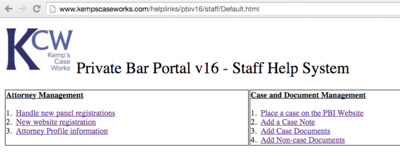

Figure 3 - Staff Video Help System
Dashboard
Once an attorney logs on, they are taken to the main menu page. This enhanced page has a dashboard showing various charts relating to the past cases they’ve taken, as well as information on the organization itself. An example dashboard is shown in Figure 4.
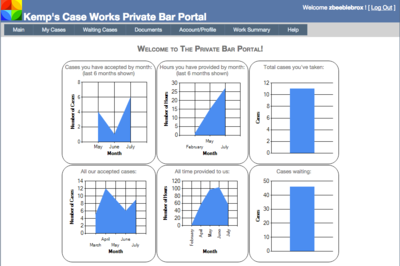

Figure 4 - Dashboard Graphs across the top of the dashboard apply only to the attorney. From the left, (1) the number of cases accepted, by month, for the last six months, (2) the total hours provided, by month, for the last six months, and (3) the total number of cases taken. Graphs along the bottom of the dashboard apply to the whole organization. From the left, (1) the number of accepted cases, by month, for the last six months, (2) the total hours provided, by month, for the last six months, and (3) the total number of cases that are waiting assignment.
Redesigned Menu Interface
The menu interface in version 16, has moved from the middle to the top of the screen. The menu shows additional choices when a mouse is placed over it, as shown in Figure 5.
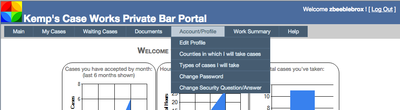

Figure 5 - Redesigned Menu Interface
File Upload
In previous versions, an attorney was limited to uploading one document at a time. Additionally, that document had to be 4 megabytes or smaller. Version 16 allows the selection of multiple files for upload. Additionally, those file are no longer subject to the 4-megabyte file size limitation. Figure 6 shows this new interface.
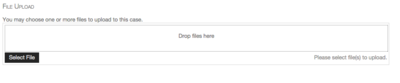

Figure 6 - New File Upload Capability
Email Notifications
Email notifications are enhanced. They now contain additional, helpful information, such as the name of the attorney involved, and the name and case number of the client.
Lawyers
Log In and Registration
New Attorney
An attorney, not currently in the system, can notify you of their desire to help you. The attorney just goes to the Log In page and clicks on the link that reads, “If you are an attorney who would like to help us, but haven’t in the past….” Figure 7displays this link.
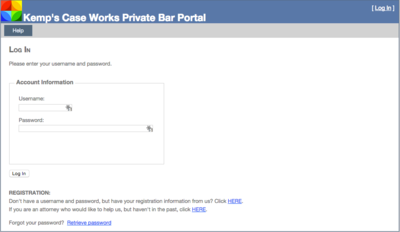

Figure 7 - New Attorney When the attorney clicks the link, a registration page appears as shown in Figure 8. Once completed a “Thank You” page appears and the message that they will be contacted by the organization shortly.
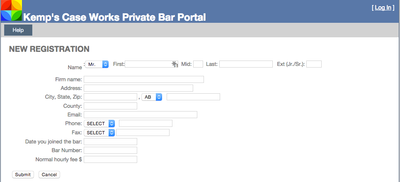

Figure 8 - New Attorney Registration Page
Website Registration
An attorney currently in your system only needs three pieces of information to register to use the website: 1. Their attorney number (ID) in your Prime system, 2. Their exact first name in your system, and 3. Their exact last name in your system. With that information, they access the Log In page and use the link “Don’t have a username and password, but have your registration information from us…”, shown in Figure 9.
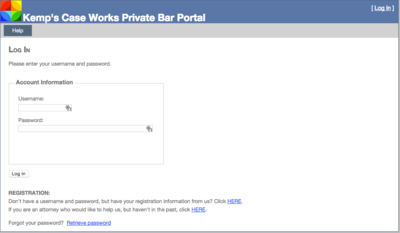

Figure 9 - Website Registration Once the link is clicked, the registration page appears, as shown in Figure 10.
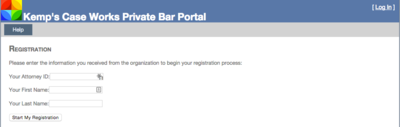

Figure 10 - Attorney Verification The Portal uses this information to verify the identity of the attorney—much like a bank might use your social security number, name, and zip code when you register to use the bank’s website. If the Portal verifies the information, it directs the attorney to the registration page where they enter a personalized username and password, as shown in Figure 11. All of the information on the registration page is required.
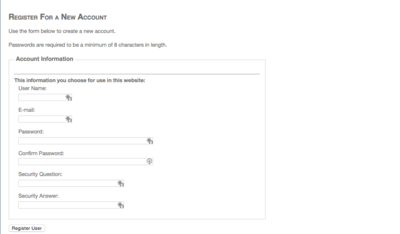

Figure 11 - Registration Information Once the registration information is entered and accepted by the Portal, the attorney is directed to the main page.
Forgot Password
If the attorney has forgotten their password, there is a “Retrieve password” link on the Log In page, shown in Figure 12.
Figure 12 - Retrieve Password The password is mailed to the attorney after the correct user name is entered.
Log In
The attorney can log into the system after successfully registering or receiving the user password and username, as shown in Figure 13.
Figure 13 - Log In The main page appears upon the successful entry and acceptance of those credentials by the Portal.
Case Management
New Case
To accept a new, waiting case, the attorney should click on “Waiting Cases” in the menu. This opens the waiting case search screen, shown in Figure 14. There is a “Help” button after the first line of text on the page. This pop-up page gives the attorney more information about the process of reviewing waiting cases.
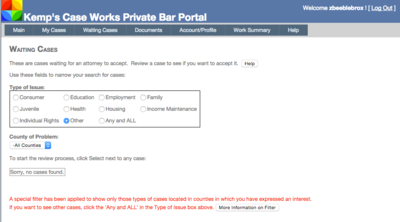

Figure 14 - Waiting Cases When the Waiting Cases page first opens, it uses the counties and subjects in the attorney’s profile to display only cases that match those criteria. The red text shown at the bottom of the Waiting Cases page, shown in Figure 14, notifies the attorney that a special filter has been applied. The attorney can click on the “More Information on Filter” button to get a list of the counties and subjects entered for him. That text also tells the attorney that they can change the filtering by changing the options in the search boxes. The search boxes work together. For example, the selection of “Consumer” in the “Type of Issue” box and a selection of a particular county in the “County of Problem” dropdown results in the display of only consumer cases in that county. If no cases appear on the list after either the automatic or manual filter is entered, the “Sorry no cases found” message appears as in Figure 14. Otherwise the cases that satisfy the criteria appear, as shown in Figure 15. If this search results in a large number of cases, the attorney can page through the results using the numbers at the bottom of the case list.
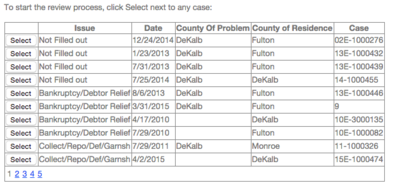

Figure 15 - Waiting Case List If an attorney wants to review a particular case, they click the “Select” button next to the entry. This starts a three-stage acceptance process. In Stage 1, the attorney reviews a short note about the case that was previously entered by staff, as shown in Figure 16.
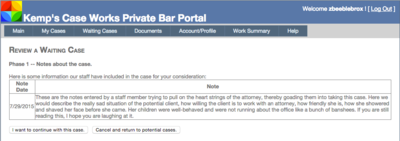

Figure 16 - Waiting Case Phase 1 After reviewing the note, the lawyer can refuse the case and click on the “Cancel and return to potential cases” button. Otherwise they continue to Phase 2 by clicking the “I want to continue with this case” button. In Phase 2, the attorney is given the names of the client and opposing parties. This allows the attorney to check for conflicts in their own caseload. As with Phase 2, there is a “Cancel” and a “Continue” button, as shown in Figure 17.
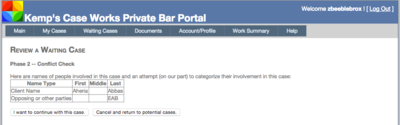

Figure 17 – Waiting Case Phase 2 In Phase 3, specific information about the client, including the client’s contact information is displayed. This is the final phase of the review. The only two options at this point are to accept the case or cancel and refuse it, as shown in Figure 18.
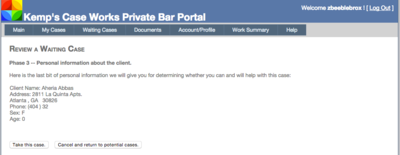

Figure 18 - Waiting Case Phase 3 If the attorney clicks the “Take this case” button, the screen shows “Case Taken”. The attorney can then click the “Case taken. Click here to return to main menu.” button to return to the main screen.
View Open Cases
An attorney’s open cases are displayed by clicking on “My Cases” in the main menu, as shown in Figure 19.
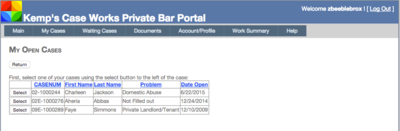

Figure 19 - Open Cases To interact with a particular case (to add time, for example), click the select button next to the case. When selected, the case web page is displayed, as shown in Figure 20.
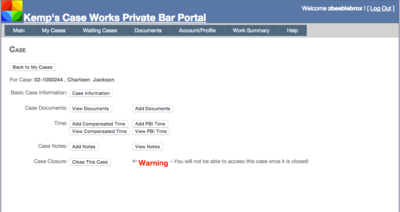

Figure 20 - A Case Overview
Case Information
To review general case information, including the client name, address, other contact information, and adverse parties related to the case, an attorney clicks the “Case Information” button in the case web page. A panel pops up displaying this information, as shown in Figure 21.
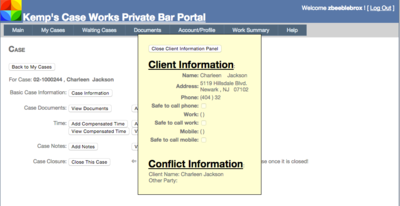

Figure 21 - Client Information Panel To close the Client Information Panel, click the “Close Client Information Panel” button.
Case Documents
To view case documents, click the “View Documents” button in the case web page. The Document Panel pops up over the client web page, as displayed in Figure 22.
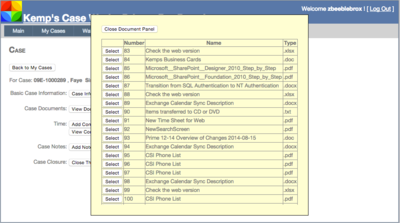

Figure 22 - Document Panel If there are more documents available than can be shown in the panel, you can scroll up and down within the panel to see the rest of the document list. To open a particular document, click on the “Select” button next to the document. To close the Document Panel, click on the “Close Document Panel” button. To add a document to the case, click on the “Add Documents” button in the case web page. The Add a Document web page appears, as shown in Figure 23.
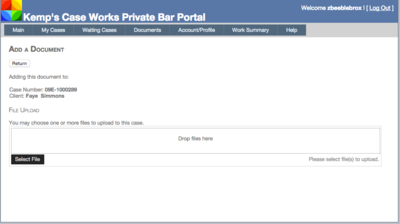

Figure 23 - Add a Document Using this form, you can upload one or more documents to the system. Depending on the type of operating system and web browser you are using, you may be able to drag documents from your computer (e.g., the desktop, Windows Explorer, Apple Finder, etc.) and drop them on the “Drop files here” portion of the screen, shown in Figure 24. This is dependent on the browser and operating system you are using. Otherwise, click the “Select File” button to choose one or more files for uploading.


Figure 24 - Drag and Drop Functionality As you drag and drop or select files, the files to be uploaded should display below the selection area, as shown in Figure 25. The files should be shown as “pending”, meaning they have not yet been uploaded to the Portal.
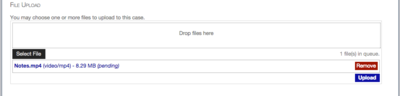

Figure 25 - Files Pending Upload After the attorney makes all the file selections desired, clicking on the “Upload” button processes each file. For large files a status indicator appears on the bottom of the screen showing the percentage of the file uploaded. Once completed, the status behind that file will change from “pending” to “Uploaded”. The “View Documents” option on a case shows the files that have been successfully uploaded. [In initial testing, files over 50 megabytes were uploaded to the system without problem.] Click the “Return” button on the page to return to the case web page.
Time
Depending on the type of time the organization wants used, an attorney may only have “Compensated” time or “PBI” time buttons available on the case web page. The View buttons (for each) will result in a panel popping up over the case web page displaying that type of time data. The panels for Compensated and PBI time show in Figure 26 and Figure 27, respectively. Note that with Compensated entries, there are also columns showing payment information, including date and amount.
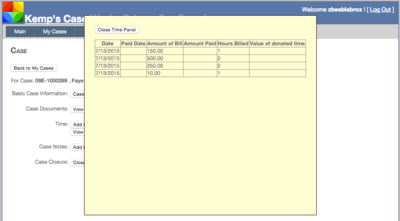

Figure 26 - View Compensated Time
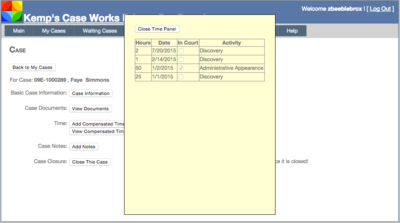

Figure 27 - View PBI Time The time Add buttons (for each) show panels that allow an attorney to enter information relating to his services in that case. The Compensated and PBI time input pages are shown in Figure 28 and Figure 29, respectively.
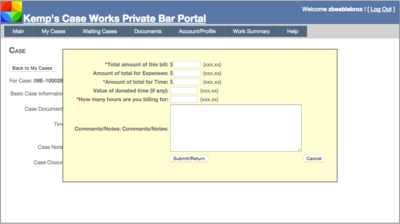

Figure 28 - Add Compensated Time For compensated time entries, the total bill amount is entered first. The amount of expenses is entered in the second box. The third box shows the amount of the bill for the attorney’s time. For example, if the total bill being presented is $550, the number 550 is placed in the first box. If $50 of that is for expenses (for example, deposition copy costs), 50 is placed in the second box. The third box is the total bill (box 1) minus the expenses (box 2). That equals the amount the attorney is paid for his time. If the attorney donated time, the value of that donated time is put in the fourth box. The fifth box is for the number of hours the attorney spent during this bill. Finally, the attorney may enter any notes or comments about the bill in the last box.
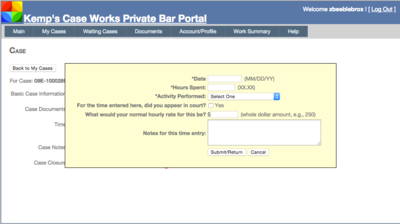

Figure 29 - Add PBI Time The PBI time form allows the attorney to track time in the case by entering the date, how many hours spent on the case, what activity was performed, whether it was in court, and the normal hourly rate. As with Compensated time entries, the attorney may enter a note for this time entry.
Case Notes
The add and view notes buttons on the case web page allow the attorney to interact with case notes. To add a case note, click “Add Notes”. The add page, shown in Figure 30, allows the attorney to select from some common notes. He simply uses the dropdown and selects an entry. The resulting text is put into the case note entry box. The attorney may then modify that text. Alternatively, the attorney can also just enter a case note manually in the case note entry.
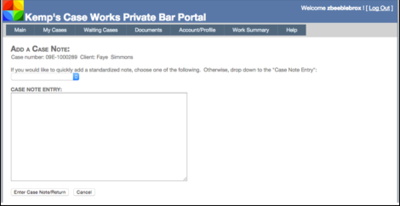

Figure 30 - Add a Case Note When finished with the note, pressing the “Enter Case Note/Return” button will add that case note to the case and then return to the case web page. If the attorney decides not to enter a case note, pressing the “Cancel” button returns to the case web page. The View Notes page, shown in Figure 31, displays the case notes created in the Portal, or that have been specially added by staff for the Portal.
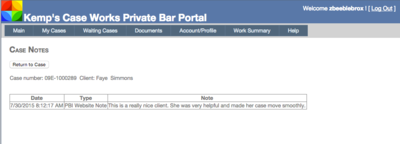

Figure 31 - View Case Notes
Close A Case
When an attorney is finished with the case and it should be closed. Pushing the “Close This Case” button on the case web page displays the warning shown in Figure 32.

Figure 32 – Warning Before Closing A Case As noted in the warning, once an attorney closes a case, it is no longer accessible and will no longer show on the open case list. This is very important, since no other additional documents, time, or notes can be added through the portal. The Case Closing web page is shown in Figure 33. The attorney first selects how to close the case using the dropdown. This displays the standard list of Legal Services Corporation closure reasons. Next, indicate whether the case was contested.
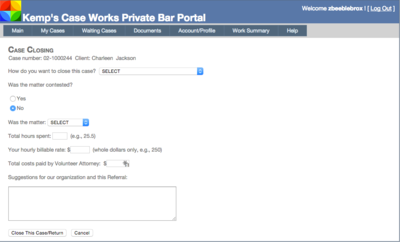

Figure 33 - Case Closing Web Page Using the dropdown list, choose whether the issue was won, lost, doesn’t apply, etc. Enter the number of hours spent, together with the normal, hourly billable rate. If the attorney paid for any costs, that amount should be entered. Last, a final note about the case may be entered. Clicking the “Close This Case/Return” button closes the case and return to the main menu. Clicking the “Cancel” button cancels closing the case and returns to the case web page.
Non-Case Documents
The organization may provide documents to private bar attorneys for their use in practice for the organization or for general use in their practice. These documents appear in the Documents section of the Portal. Access the Documents by clicking on “Documents” in the main menu. The Miscellaneous Documents web page appears with a tree view of the documents available. The tree view allows the organization to categorize documents based on whatever method they desire, as shown in Figure 34.
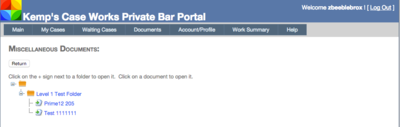

Figure 34 - Miscellaneous Documents If a folder has a plus sign (+) next to it, there is something within that folder. Click on the plus sign to open that folder and display its contents. If the attorney wants to open a document, just click on the document. This downloads the document to the attorney’s computer. Depending on the Operating System and web browser, the document may open immediately, or there might be a prompt to save the file for opening once the download is complete.
Account/Profile
Edit Profile
An attorney edits his profile by navigating in the menu to Account/ProfileEdit Profile. The attorney may change any of the items in the profile, as shown in Figure 35, including name, contact information, bar information, and normal hourly rate.


Figure 35 - Edit Profile Clicking the “Update Profile/Return” saves the attorney’s changes and returns to the main menu page. The “Cancel” button abandons the changes and returns to the main menu.
Counties
Attorneys review or edit the counties they take cases in by clicking on the Account/Profile”Counties in Which I Will Take Cases” menu option. The county selection page is shown in Figure 36. Attorneys check the boxes next to the counties in which they practice. A box can be unchecked if the attorney no longer takes cases in that county. Once all selections are made, click the “Save/Return” button at the bottom of the page to save the new selections.
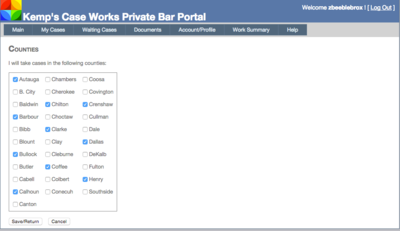

Figure 36 - County Selection Page
Subjects
Attorneys may enter or edit the list of types of cases they handle. Simply choose the Account/Profile”Types of Cases I Will Take” menu option. The Subject selection page is shown in Figure 37. At the top is a dropdown box. This categorizes the subjects based on their main topic group. The attorney chooses one of the main categories to see the subjects within that category. Then, check the boxes next to subjects the attorney will handle. Remove check boxes from subjects the attorney will no longer handle. When selections have been made for that main category, always remember to click the “Save” button before choosing another main category.
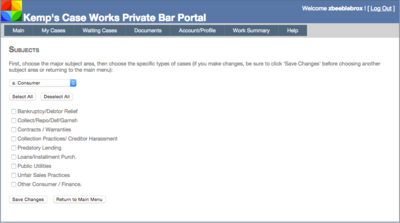

Figure 37 - Subject Selection Page
Change Password
Access the change password page by using the menu, navigating to Account/Profile and down to Change Password. The Change password screen, shown in Figure 38, should appear.
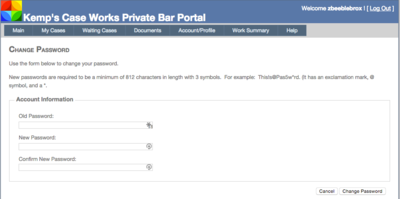

Figure 38 - Change Password Page To change his password, the attorney enters the current password in the “Old Password” field. Then enters the new password in the “New Password” field and retypes the new password in the “Confirm New Password” box. Click the “Change Password” button to change the password.
Change Security Question and Answer
To change the Security Question and Answer, navigate to Account/Profile and down to Change Security Question/Answer. The Change form should appear, as shown in Figure 39.
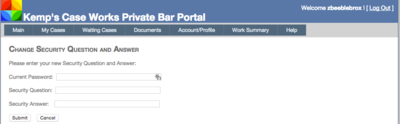

Figure 39 - Change Security Question and Answer Page First, enter the current password in the first box. Then enter the new question and answer in the appropriate boxes. Click the submit button to change the question and answer.
Work Summary
Some states require attorneys to track their pro bono work. If his work for the organization qualifies to meet that requirement, the attorney can get a summary of the time spent on cases. Click on the Work Summary menu option to get the Work Summary page, shown in Figure 40.
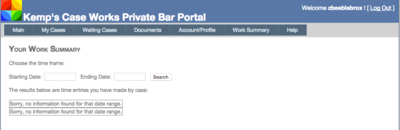

Figure 40 - Work Summary Page To use the Work Summary page, the attorney must enter a starting and ending date. For example, if there is a need to know hours for the current CLE year (say July 1, 2015 to June 30, 2016), enter 7/1/2015 into the starting date, and 6/30/2016 into the ending date. Then click Search. Compensated or PBI time (or both) appears, as shown in Figure 41.
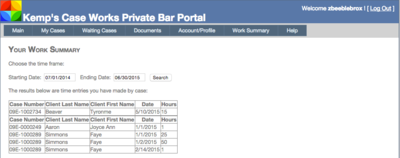

Figure 41 - Work Summary Results
Staff
Log In and Registration
New Attorney
When an attorney who is not in the lawyers system registers to be on panel, staff receives an email. That email looks something like Figure 42.
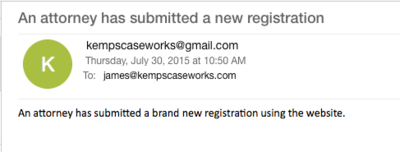

Figure 42 - Brand New Registration Email Notification Within Prime, navigate to SearchPBILawyers Web Registration. This opens the Lawyers Web Registration search screen, shown in Figure 43.
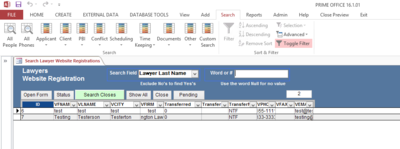

Figure 43 - Lawyers Website Registration Search Page When the Website Registration Search Page opens, it defaults to showing pending registrations. You may use the search features, like other search pages in Prime, to find particular registrations. Use the “Pending” button to return to showing pending web registrations. Double-click on an entry (or single click and choose the “Open Form” button, to open the web registration data page, shown in Figure 44.
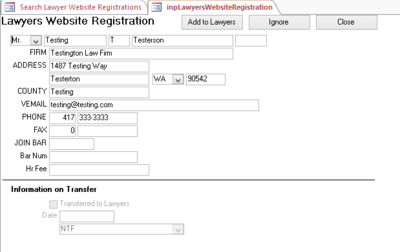

Figure 44 - Lawyers Website Registration Page You can use search screens, queries or reports to determine if the attorney is already if the system. If so, choose the Ignore button. If the attorney is not in the Lawyers table, choose the “Add to Lawyers” button to copy this information to a lawyer form, shown in Figure 45. Please note that clicking the ignore or add button on the website registration page will remove that entry from the pending status in the search screen.
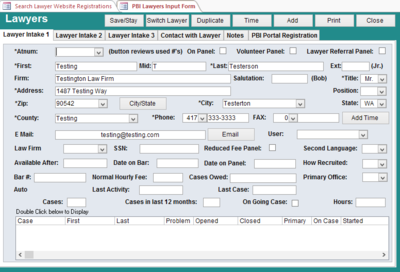

Figure 45 - Data Transferred From Lawyers Website Registration to New Lawyers Form Enter any additional information required by the organization. Make sure you enter an attorney number (Atnum) for this attorney. This attorney is now in your Lawyers table.
Website Registration
To register to use the website, an attorney must be in your Lawyers table. There are two options available to create a new website registration: (1) the organization creates the username and password and provides it to the attorney or (2) the organization provides the attorney number, and first and last name as entered in the system. The attorney uses that to create their own user name and password in the website. To manually create the website registration for the attorney, open that lawyer’s record. Navigate to the “PBI Portal Registration” tab, shown in Figure 46.
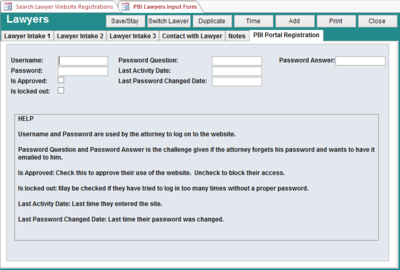

Figure 46 - PBI Portal Registration Tab In the PBI Portal Registration tab, fill out the information. The username and password must be provided to the attorney. He can then use that information to log on to the system. Ensure there is a password question and answer entered as well. Enter the current date and time into the “Last Activity Date” and “Last Password Changed Date” fields. To approve the attorney to log on to the Portal, check the box next to “Is Approved”. If you want to lock the attorney out of the website, remove the checkmark. If you want the attorney to create his own website registration (including selecting his own username, password, password question, and password answer), you merely need to provide the attorney with his attorney number from the lawyer record, together with the exact spelling of his first and last name in the system. He will use these to verify his identity in the system and create his own website registration.
Forgot Password
An attorney can use the password retrieval system in the website to retrieve a forgotten password. The attorney may also call the organization for that information. The lawyer’s form does not display the password in a clear text format; however, staff can reset that password by deleting the information in the password box and typing in a new password for the attorney. Log In Other than providing the username and password, or giving the attorney sufficient information to create his own website registration, there isn’t much to be done by the organization regarding log in.
Case Management
New Case
To place a case on the waiting case list in the Portal, change the case type to “W” for Waiting, as shown in Figure 47. Ensure there is no closure date in the case as well. Closed cases, regardless of their case type, are not shown in the waiting case list.
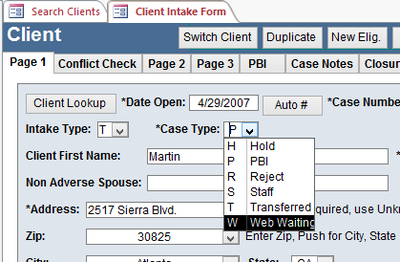

Figure 47 - Case Type Several things happen when an attorney accepts the case on the Portal. First, the case type of the case is changed from “W” to “P” for “PBI”. Second, a PBI record entry is created if one doesn’t already exist. Third, a PBI Lawyer entry is created for the attorney. This is equivalent to your assigning an attorney to a case as shown in Figure 48.
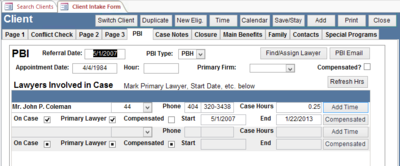

Figure 48 - Assign a Lawyer - PBI Tab Finally, an email is sent to the organization notifying staff of the fact that the attorney took the case, as shown in Figure 49.
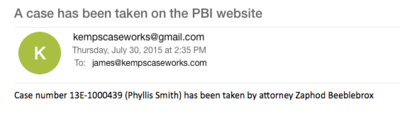

Figure 49 - Email Regarding Case Assignment
View Open Cases
If you want to see what cases are shown as waiting on the Portal, open the Client Search Screen (Menu: SearchClientClients). In the “Search Field” dropdown box, select “Case Type”. In the “Word or #” box, type in “W” (obviously without the quotes). Review the list. For any item in the list that does not have a date closed, the case should be shown on the Portal. An example of such a list is shown in Figure 50.
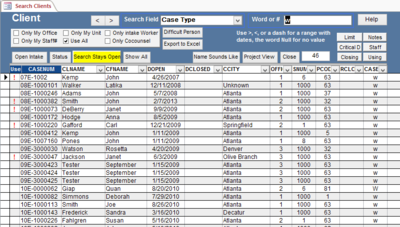

Figure 50 - Search Screen Showing Waiting Cases
Case Information
The case information that is displayed to the attorney (client name, contact information, conflict information) comes from the Client record. Changes to the client record, when saved, would be immediately reflected in the Portal the next time the case information is displayed. Case information cannot be updated or changed by the attorney using the portal.
Case Documents
If you wish to place a document in document tracking in a case and also have it displayed in the Portal for that case, simply right-click on the document in Document Tracking (page 2 of the Client record) and choose Properties, as shown in Figure 51.
Figure 51 - Right-click a Document in Document Tracking In the Document Information box, shown in Figure 52, check the box next to “Available to PBI Attorneys on the PBI Website”. The document would now be available to the attorney on the website. Please note, the document must be saved in the SQL Server to be available to the attorney. Documents that only have their link stored in Prime are not capable of being downloaded from the Portal.
Figure 52 - Document Information Page If the attorney uploads a document to the case, an email is sent to staff notifying them of the new document, as shown in Figure 53.
Figure 53 - Email Notification of a New Document
Time
When an attorney adds either Compensated or PBI Time to a case, staff will receive an email much like that shown in Figure 54 (for Compensated Time) and Figure 55 (for PBI Time).
Figure 54 - Email Notification of Compensated Time Entry
Figure 55 - Email Notification of PBI Time Entry
You may use normal procedures in Prime to review those time entries, including reviewing them in the case, or searching for the entry.
Case Notes
When an attorney enters a case note in a case, staff will receive an email notice of that, as shown in Figure 56.
Figure 56 - Email Notification of a New Case Note If staff wishes to add a case note that they want to be available on the Portal within the client’s case, simply add a new case note. Ensure the type is set to “PBI Website Note” as shown in Figure 57.
Figure 57 - PBI Website Note Type
Close A Case
When an attorney closes a case using the Portal, staff will receive an email, as shown in Figure 58.
Figure 58 - Email Notification of Case Closure The closing information noted by the attorney is entered into the case record, and the case’s date closed is entered with the day the attorney closed it.
Non-Case Documents
If the organization desires to make non-case specific documents available to their PBI attorneys, those documents may be added to the non-case document system. To access that system, in the menu, navigate to AddOtherDocument Noncase. The non-case document system screen will look like that shown in Figure 59.
Figure 59 - Non-case Document System Screen Add a document to this system as you normally would. To make the document available on the Portal, right-click on the document and choose properties. Check the box next to “Available to PBI Attorneys on the PBI Website”. Attorneys cannot add non-case documents to the system.
Account/Profile
Edit Profile
When an attorney edits his profile on the Portal, those changes are immediately made to his lawyer record in Prime. Notification of the change to the profile is sent by email to staff. Of course, staff may also edit an attorney’s profile by editing the information in the lawyer record.
Counties
Changes by an attorney to counties result in an immediate change to the lawyer record in Prime, in addition to an email being sent to staff notifying them of the change to the attorney’s counties. Of course, staff may also edit this information in the lawyer record.
Subjects
Changes by an attorney to subjects result in an immediate change to the lawyer record in Prime, in addition to an email being sent to staff notifying them of the change to the attorney’s subjects. Of course, staff may also edit this information in the lawyer record.
Change Password
Staff may change the password for the attorney by opening the lawyer record, going to PBI Website Information tab and changing the password entered into the password field. The field does not show up in plain text, so staff cannot read existing passwords from within the lawyer record.
Change Security Question and Answer
Staff may change the Security Question and Answer for the attorney by opening the lawyer record, going to the PBI Website Information tab and changing the Security Question and Answers entered into the corresponding fields.
Work Summary
You may produce a list of the attorney time entered by running the appropriate reports corresponding to the type of time entered. Many of these reports may be found by going to the menu and navigating to ReportsReport Selector. For compensated time entries, in the Report Selector, in the lower left corner under “Other Tables, Lawyers, Oservice, etc.”, use the dropdown to choose “Compens” for compensated time. Choose one of the reports in the Choose Report dropdown. Enter the criteria and run the report. For PBI time entries, in the Report Selector, in the left column, in the middle of the page, use the PBI Time dropdown to choose a report. Enter the criteria and run the report.
Email Setup
The web system uses email settings to send email notices to you as well as to the attorney (for example, in the event the attorney forgets his password). Since the system will send email, an email account for sending email is necessary. We suggest that this be a “send only” email account. In other words, the email should not be someone’s live account. You may still want to have someone monitor that account occasionally. Some organizations have chosen to establish an account called “DoNotReply”, with a name of “Do Not Reply”, so that the person receiving the email is notified by the name of the sender that they should not reply. So, for example, an email might come from the email address: DoNotReply@YourOrganizationDomain.com For system notifications, for example a new attorney registration or an attorney adding time to a case, we suggest that a group email be established to receive those notifications with more than one staff person being members of that group. Some organizations have chosen to establish a group email called “PBI Website Group”, with email being sent from the Portal to an email address something like: PBIWebsiteGroup@YourOrganizationDomain.com We suggest a group email instead of a single staff person for a reason: if email is sent to a single staff person and that staff person leaves, email notifications may not be received by anyone. With a group, there is the hope that remaining staff people would realize that one staff leaving would necessitate another being added to the group.
System Setup
Some settings are necessary for the setup and use of the system. These settings are stored in a new table called PBIWebPortalSettings using a form named fPBIWebPortalSettings, shown in Figure 60.
Figure 60 - PBI Web Portal Settings Form The settings shown include the email server settings (address, port, security), credentials of the email “user” that will be sending the email (username, password), the email address that will receive notification emails (address), whether the organization uses PBI Time Slips or Compensated Time Slips, whether the organization wants to track changes to cases in the case notes, what staff number should be used to make entries in the system, and the office number that should be used in entries in the system. The final box must always be TRUE, and it notes that it allows only one row in the table. If you try to add more than one row, you will receive an error. Additionally, the staff number and office number must exist in the system. You cannot use a nonsensical number for either. Generally, these are set to 9999 and entered in the SMEMBER and SUBOFFICE tables. These settings were, in previous versions, stored in the website itself. However, they have been moved to the database to make them easier to change.