Office 365 Calendar Sync - Administrative Setup
Prime 16 utilizes technologies made available through Office 365 (O365) to provide users with the ability to synchronize their Prime and O365 calendars. This new sync is very easy to use in Prime. This is the updated version as of 05/19/2026. Prior version information is below in the "Archived/old material" section.
Prime Microsoft 365 Calendar Sync Instructions
These instructions are for organizations setting up Prime calendar sync with Microsoft 365 / Outlook. Each organization should create its own Microsoft Entra application registration in its own Microsoft tenant.
1. Setup
A. Microsoft 365 / Entra Administrator Setup
The organization's Microsoft 365 administrator must create an app registration in Microsoft Entra. This allows Prime to connect each Prime user to that user's Microsoft 365 Outlook calendar.
- Sign in to the Microsoft Entra admin center. https://entra.microsoft.com
- Go to:
Entra ID → App registrations
- Choose:
New registration
- Enter a name such as:
Prime Access Calendar Sync
- For supported account types, choose:
Single tenant only - <your domain name>
- This means the app is only for your organization's Microsoft tenant.
- Create the app registration by clicking "Register"
- After the app is created, copy these two values:
Application (client) ID and Directory (tenant) ID
- These will be entered into Prime.
B. Configure the Redirect URI
In the app registration, go to:
Authentication
Click "Add Redirect URI" and choose:
Mobile and desktop applications
In the blank box (that may show an example entry), add this custom redirect URI exactly:
http://localhost:3017/
Important: The final slash matters!
Prime uses a desktop OAuth sign-in flow where Microsoft signs the user in through the browser and redirects back to a local listener on the user's workstation.
C. Enable Public Client Flow
Still under the app registration's Authentication page, in the Settings section, enable:
Allow public client flows
Set it to:
Enabled
Prime is a desktop Access front end, so it should be treated as a public client.
D. Add Microsoft Graph Permissions
In the app registration, go to:
API permissions
Add Microsoft Graph delegated permissions:
User.Read
Calendars.ReadWrite
offline_access
Prime uses delegated permissions because each Prime user signs in as themselves.
If the organization blocks user consent, an administrator may need to grant consent for the organization.
2. Prime Administrator Setup
After the Microsoft administrator creates the Entra app, open Prime and go to the calendar sync settings screen.
Admin → Custom Admin
and choose
Exchange Calendar Sync Settings
Enter the following values:
Tenant ID:        Directory (tenant) ID from Entra
Client ID:        Application (client) ID from Entra
Redirect URI:     http://localhost:3017/
Default Time Zone: Central Standard Time
Enter the appropriate Time Zone for your Organization.
Then enable organization-level calendar sync:
Calendar Sync Enabled = Yes
Recommended sync window:
Sync Past Days:    30
Sync Future Days:  365
Each organization can adjust those values later.
3. Per-User Setup in Prime
Each Prime user who wants Outlook calendar sync must complete a Microsoft sign-in.
- Log in to Prime as the user.
- Open the Microsoft 365 calendar sync setup/sign-in screen.
- Choose:
Sign in to Microsoft 365
- A browser window opens.
- The user signs in with their Microsoft 365 account.
- Microsoft may ask the user to consent to calendar access.
- After successful sign-in, Prime saves that user's Microsoft identity and refresh token.
The user should only sign in to the Microsoft account that corresponds to their own Outlook calendar.
Testing
Testing should be done first by an administrator or support user before rolling out to all staff.
Test 1 — Confirm Microsoft Sign-In Works
In Prime, sign in to Microsoft 365 for the test user.
Expected result:
Prime confirms that Microsoft Graph sign-in was saved.
The user's Microsoft display name, email, or user principal name is shown.
If sign-in fails, check:
Tenant ID
Client ID
Redirect URI
Public client flow setting
Graph permissions
User/admin consent
Test 2 — Confirm Saved Token Works
Run the saved connection test from Prime.
Expected result:
Saved Microsoft Graph connection works.
This proves Prime can refresh the Microsoft connection without requiring the browser sign-in every time.
Test 3 — Create and Delete a Temporary Outlook Event
Run the Graph calendar create/delete test.
Expected result:
Prime creates a temporary Outlook calendar event.
Prime then deletes it.
No event remains in Outlook.
This confirms the Microsoft Graph Calendars.ReadWrite permission is working.
Test 4 — Prime to Outlook
- Create a simple future calendar item in Prime.
- Run the sync.
- Open Outlook.
Expected result:
The Prime calendar item appears in Outlook.
Then change the Prime calendar item's reason or time and run sync again.
Expected result:
The Outlook event updates.
Then delete the Prime calendar item and run sync again.
Expected result:
The Outlook event is deleted.
Test 5 — Outlook to Prime
- Create a simple future event in Outlook.
- Run the sync in Prime.
Expected result:
The Outlook event appears in Prime.
- Change the Outlook event subject or time.
- Run the sync in Prime again.
Expected result:
The Prime calendar item updates.
Test 6 — Outlook Deletion Review
- Create or use an Outlook event that has already synced to Prime.
- Delete the event in Outlook.
- Run the sync in Prime.
Expected result:
The Prime calendar item is not deleted automatically.
The item appears in the Outlook Deleted Calendar Review screen.
From the review screen, the user can choose one of the available actions:
Recreate in Outlook
Keep Prime Only
Accept Delete
Recommended first test action:
Recreate in Outlook
Expected result:
The event appears again in Outlook.
The review item is resolved.
Test 7 — Recurring Outlook Events
For the first production version, Prime treats Outlook recurring events as individual calendar entries inside the sync window.
Test with a short recurrence, such as:
Daily event for 3 days
Expected result:
Each occurrence appears as a separate Prime calendar item.
Prime does not create or edit the Outlook recurrence pattern itself.
General Use
Normal User Sync
Users should normally run:
Sync Microsoft 365 Calendar
This should call the Prime user-facing sync routine:
RunExchangeCalendarSyncForUser
This performs the full sync:
Outlook → Prime
Prime → Outlook
Deletion review handling
Missing Outlook event verification
Users should not normally run developer/test commands.
What Sync Does
When a user runs calendar sync, Prime will:
- Bring Outlook-created calendar events into Prime.
- Bring Outlook changes into Prime.
- Mark Outlook-deleted events for review instead of automatically deleting Prime calendar rows.
- Push Prime-created calendar items to Outlook.
- Push Prime changes to Outlook.
- Delete Outlook events when the Prime calendar item was deleted.
- Verify that tracked Outlook events still exist.
What Users Should Do When Outlook Deletion Review Appears
If a user deleted an Outlook event that Prime still has, Prime will show it in the review list.
Choose:
Recreate in Outlook
when the event should still exist in Outlook.
Choose:
Keep Prime Only
when the event should remain in Prime but should no longer sync to Outlook.
Choose:
Accept Delete
only when the Prime calendar item should also be removed.
Important User Notes
- Users should avoid editing the same calendar item in both Prime and Outlook at the same time.
- Sync should be run after making changes.
- If an event is private in Outlook, Prime may skip or limit what it imports.
- For recurring Outlook events, Prime currently handles individual dated occurrences, not the recurrence pattern itself.
- If sync fails, the user should contact support and provide:
- The date/time they ran sync.
- The calendar item involved.
- Whether the item was changed in Prime or Outlook.
- Any error message shown.
Support Checklist
When troubleshooting an organization, check these first:
- Entra app exists in the organization's tenant.
- Redirect URI is exactly:
http://localhost:3017/
- Public client flow is enabled.
- Graph delegated permissions include:
User.Read, Calendars.ReadWrite, offline_access
- Tenant ID and Client ID are entered correctly in Prime.
- Organization-level sync is enabled.
- Staff-level sync is enabled.
- User has successfully signed in from Prime.
- SQL tables, indexes, and triggers are installed.
- Outlook Deleted Calendar Review screen shows only the current user's review items.
The normal production command for users is:
RunExchangeCalendarSyncForUser
Archived / old material — This information is outdated and kept for reference only.
Setup for individual staff members is very easy. Within the staff member forms, go to the Calendar Setup tab. Insert the appropriate path to the Office 365 website (shown as https://outlook.office365.com in the example below) and the O365 username (shown as test@kempscaseworks.onmicrosoft.com). To test that the entries are valid, click the test button and, when prompted, enter the user’s O365 password.


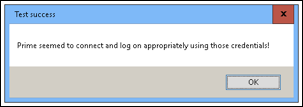
The system will use the entries to attempt to contact the O365 system and test the username and passwords entered. If Prime believes the settings are correct, a message is shown indicating the test seemed to work.

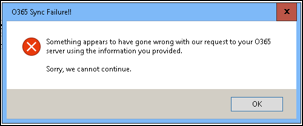
A failure results in a failure message:

Set the time zone for the staff person using the dropdown list. Determine the method of synchronization desired. For example, if the staff person wants to sync from O365 to Prime, and from Prime to O365, check both boxes. If the staff person only wants to sync from O365 to Prime, select that single box. If the staff person only wants to sync from Prime to O365, select that single box.
Syncing only one way (i.e., choosing only one checkbox) will result in inconsistent entries in both calendars. For example, when syncing only from Prime to O365, entries in Prime will be reflected in the O365 calendar. Changes to those entries will also be reflected in the O365 calendar. New entries or changes to the O365 calendar will not change any entries in Prime.
The first two times a user synchronizes their calendar will take longer than successive syncs. The reason for that is the initial syncs require getting all entries from both calendars and making sure they are copied to the other calendar. Because entries are not yet tied to one another, entries in the calendars may appear to duplicate.
To illustrate, before synchronization, a staff member would enter a calendar item in Prime, and then enter that same item in O365. Neither O365 nor Prime associate those entries as the same entry. Rather, each entry is treated as unique. When a sync is performed, the calendar item in Prime is added to the O365 calendar. The O365 item is added to Prime. Those entries may be for the same event, but O365 and Prime do not know that.
After the initial synchronization, new entries in either calendar should not appear to “duplicate” in the other calendar. Each entry, when synched, has its own unique identifier that each calendar understands. When a change is made in one location, the same change is made in the other using those unique identifiers.
After the first two syncs, synchronization should be much faster. Since only changes on either side are transferred, there will be much less to copy. The first couple of syncs should be made using the O365 Sync Start Page. This page is accessed using the top-line menu bar and going to SearchCustom Search and clicking on the Exchange Sync button:
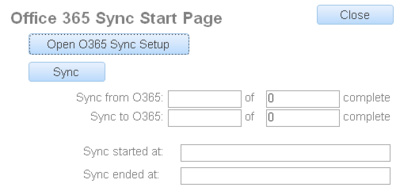

A user may press the “Open O365 Sync Details” button to get to the original setup page. Pressing the “Sync” button will start the synchronization process. The user is prompted for his password. [Note: The sync is only performed for the user who is currently logged into Prime.] The system, depending on the settings made for the user, will then sync to and from O365/Prime.
As the synchronization progresses, updates are shown on this page, including the total number of items to synchronize, and how many are complete. Finally, the starting and ending times for the sync are displayed.
After the initial synchronization is performed by the user, and when exiting the system using the Exit menu option, a user will be asked whether he wants to perform a calendar sync. Answering “Yes” will initiate the calendar sync before exiting the system.
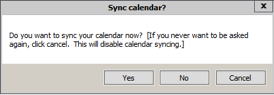

Answering “No” will avoid a calendar sync. Finally, clicking “Cancel” will indicate the user never wants to be asked again and effectively disables calendar syncing.
[Some limitations exist on syncing. Old entries are ignored. Only entries within the last few days and into the future are synced. Changes to old entries are also ignored. This helps improve the speed of syncing and limits bandwidth use. Additionally, because Prime is a standalone product, it is not a true “calendar client”. Moving O365 calendars or resetting the sync settings in Prime will cause all items to be synced and (potentially) duplicated. Synchronization only takes place when Prime is running and synchronization is triggered.]
The start and stop time in Prime and O365 are copied between calendars. Additionally, the “Note” in Prime is used as the title in the O365 entry and vice versa.
Two Factor Authentication
For O365 accounts that have two factor authentication (2FA) enabled on the account, you may have to set and use an application specific password to bypass the 2FA.