Intelligent Intake System III
Documentation for the Intelligent Intake System III Clients & Eligibility This document explains how the Intelligent Intake System works, how to set it up, and the objects that support it. You don’t need to be a programmer to set up the lists of intake questions and dependent documents. However, like learning a cell phone app, you do have to invest some time to learn how to set up and use the system. Having some training from KCW could save you a lot of time. I. Overview The Intelligent Intake System allows users to: A. Build a set of questions to ask clients in an interview on either or both the Eligibility and Client intakes. B. Design questions that branch to different questions, dependent upon the answers given by the interviewee. C. Have List (multiple choice) questions that branch to different follow-up questions, depending on the interviewee’s selection. D. Set Questions to loop back, dependent on the answers. An example would be questions about the name and age of a child. If there were additional children, the interview would loop back and the questions repeated as many times as there are children. E. Take these questions and answers and save, print and transfer them to case notes. F. Link advice to the questions. Direct this advice to the intake worker and/or client, and display this advice during the interview. G. Link prompts to questions and direct these prompts to the intake worker or client. H. Automatically generate documents, the contents of which are dependent upon the answers given by the interviewee.
II. Definitions A. Questionnaire – A set of questions for the Applicant or Client that allows for branching, looping, etc. B. Interview – A Questionnaire and the Applicant's or Client's answers created by the Intelligent Intake System
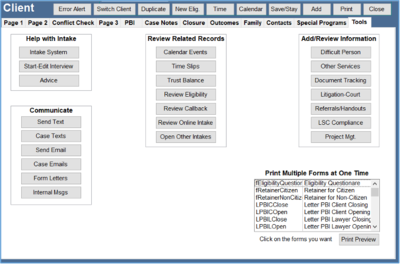
III. How to Use the Intake System – An Example Interview in Pictures A. The Interview begins by selecting the Intake System button on the Tools tab of either the Client or Eligibility Intake. Earlier versions of Prime have this choice on page 2 of the Client Intake or page 1 of the Eligibility Slip.

Older Versions of Prime

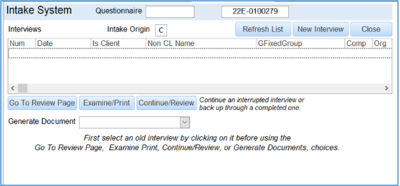
B. This opens up the Intake System form, seen below. This form allows you to: a. See a list of the old interviews on this case b. See the name of the person interviewed if someone other than the client c. Review an old interview d. Start a new interview e. Go to the last completed question on an old interview f. Generate a document for an old interview.

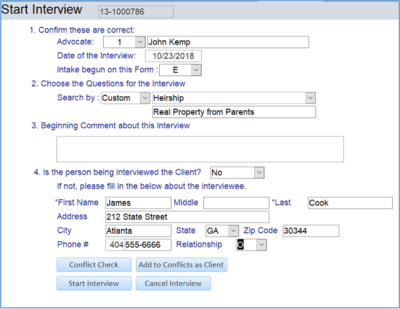
C. We click on ‘New Interview’ to begin the interview. This takes us to the Start Interview screen. It is the umbrella page that sets who you are interviewing, who is doing the interview, the set of questions to use, etc. Here we are not interviewing the client. Therefore we enter the information about the person we are interviewing and then do a conflict check to insure there isn’t a problem. It also senses where the interview is occurring, here the Eligibility Slip.
D. We can select a list of questions based on Problem Code, Special Problem Code, National Index Code or a Custom name. Here we select questions from a Custom name called Heirship. Press Start Interview to begin the interview.
Note: Only the Questionnaire designated either B (Both) or E (Eligibility) will show up on an Eligibility Intake. A Questionnaire marked as B or C (Client) will show on a Client Intake.

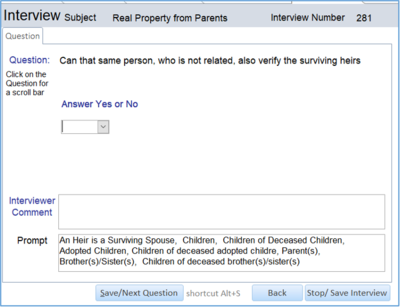
E. There is one question and answer per page. Only one question is displayed since what the next question is can vary dependent on the interviewee’s answer. The user can enter: a. The answer to the question b. A comment about the question and answer c. See a prompt and/or advice that applies to the question d. Go back to a previous question e. Save the Answer and move to the next question f. Stop the interview and store the questions and answers
F. The questions can loop. This means that the same set of questions can be answered several times, such as when entering a list of children, each one with a separate name, birthdate, etc.
G. The questions can branch, based upon the answers given by the client. This means that different lists of questions can be asked or skipped, depending on the answer given by the interviewee to the previous question.
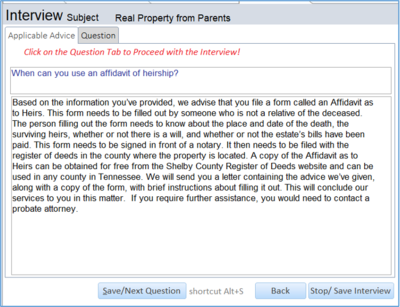
H. A Prompt can help the interviewer or interviewee with a questions. The one below helps the interviewee understand what an heir is.

I. Answers to questions can be a: a. Date b. Dollar Amount c. Number d. Memo e. Letter f. Yes or No g. List (multiple choice)
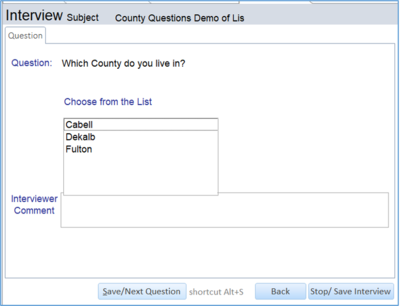
J. Below is a question that presents the user with question that give a List to choose from. The next question the user sees is determined by which of the ‘multiple choices’ they select from the List. For example, Cabell might take them to a list of questions dealing with applying for rental assistance whereas choosing Fulton might go to a different question (since Fulton County might not offer rental assistance).

K. This question provides advice based upon previous answers. The Advice tab is normally hidden and only appears when advice is associated with a question. Note, to proceed the user clicks the Question tab.

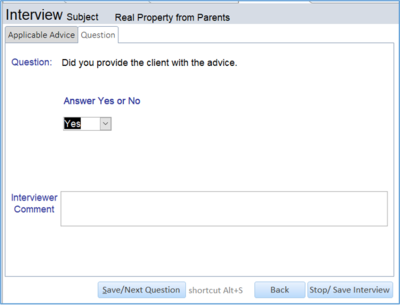
L. Once the Question tab is chosen the interviewer can confirm that the advice was given to the interviewee. Note, the Applicable Advice tab is still showing if the interviewer wants to refer back to it.

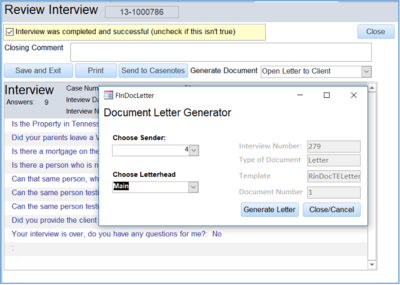
M. When the interview is completed the Review Interview page opens. This allows the interviewer to do multiple things with the interview.
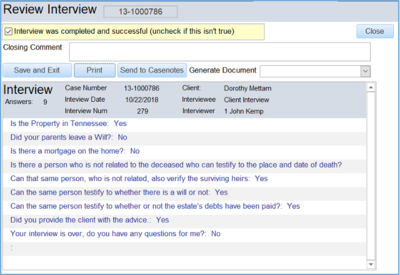

They can: a. Indicate if the interview was completed and successful. b. Enter a closing comment about the interview. c. Print out the interview. There are signature lines at the end of the document for the Interviewer and the Interviewee to sign.

d. The interview can be sent to the Client’s case notes. The interview is still saved without doing this. However, putting it with notes makes it more convenient to review.

e. We can also choose to generate a document. Here we select a form letter. A form pops up that allows us to choose who signs the letter and the letterhead that is used.

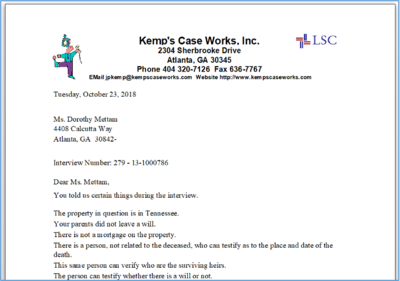
f. This is the example letter. The contents of the letter change based upon the instructions that were used to set up the document. This is a simple letter set up to show how things work.

IV. How to Administer the Intake System The people using the Intake system fall into two categories. Those who use the Questionnaires to interview applicants or clients, and those who build the interviews. This section deals with building the Questionnaires for intake people to use.

A. Accessing the Intelligent Intake Script Administration Page a. The Administration Page is used to set up the Questionnaires and questions, setup the documents, find existing interviews and perform error checking. b. Since these are administrative functions, you wouldn’t want everyone to access them. Only people who are administrators have permission to use the control panel. c. The location of the button to send you to the control panel Admin section, either on the: i. Custom Admin page ii. Or integrated into the Ribbon Bar and Touch tiles under Admin.


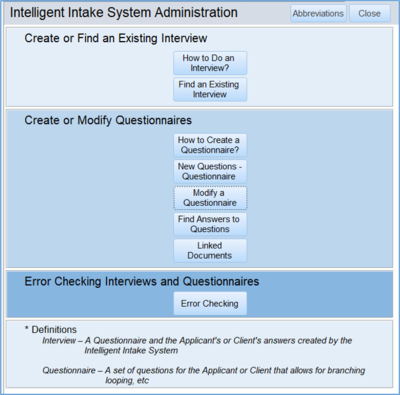
B. The Administration Page has 8 buttons a. The first explains how a user accesses the questionnaires from the Client or Eligibility intake and conducts an interview. b. The second allows the administrator to find completed Interviews on Eligibility or Client Intakes and open the desired intake. c. The third explains how to create a new Questionnaire. d. The fourth provides the tools to create a new Questionnaire. It allows users to create new Questions and add them to the Questionnaire. e. The fifth allows the user to look at the existing questions using a search screen and modify the way the question will work on a Questionnaire in the future. f. The sixth provides a search screen to show the questions used in interviews. It also shows the answers that the clients gave to the questions. g. The seventh is a tool to setup linked documents. This allows the user to generate letters, pleadings, forms, memos, etc., the contents of which depend upon the client’s answers. h. The last button provides error reports that allows the administrator to find problems in the system.
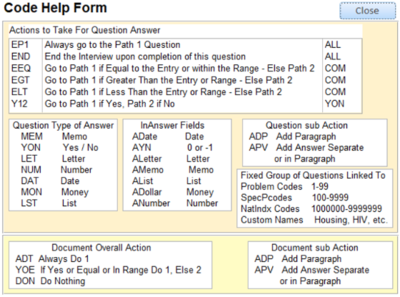
C. The Abbreviations Button The system uses abbreviations to make setting things easier. Click on the Abbreviations button to reference what these codes mean. This displays the actions that can be selected under questions and documents.

D. The Fourth Button – Creating a new Questionnaire and Questions The administrator who sets up the questions must determine how the users will find the list they need. Questionnaires can be linked to or placed under four different ‘areas’. a. Pcode b. Special Problem Code (SpecPcode)] c. National Index (NatIndx) d. Custom Names The more specific the area, the easier to construct the questions. For example, it is easier to construct a list of questions based upon the Special Problem Code of a ‘lockout’, then to try and do a list of questions based upon the much broader Problem Code ‘Private Landlord/Tenant.’
Note: When we speak about naming a group of questions, it is referred to as a Questionnaire. Second, the ‘name’ of a Questionnaire can be a custom name such as ‘Lockouts’ or a number such as 6300, which might be a Special Problem Code representing a Private LL/T Lockout. To avoid confusion it might be best use only one area to place your Questionnaires, such as Special Problem Code. That way your staff won’t have to look in all the four areas to find the Questionnaire they need.
Note: A Questionnaire may work at both the Eligibility and Client Intake OR they might only be appropriate for only one or the other. For example, asking detailed information about an adverse party on the Eligibility Slip, when the applicant hasn’t yet been accepted, might be inappropriate. Gathering information for an acceptance or rejection letter on the Client Intake might be useless if the person was already accepted as a client. Here the user can select to edit information about an existing Questionnaire.

Adding a new Questionnaire or editing and existing one uses the same form.

e. Click on Add a Questionnaire and enter a new name for a list of questions. The form setting up the Questionnaire is very simple.
f. You type in the Code or Name of the Questionnaire. You have a choice of using the following for naming the ‘Questionnaire’: i. The Problem Code ii. The Special Problem Code iii. The National Index Code iv. A custom name for the Questionnaire, such as ‘Veterans’ Project’
g. Add a description of the Questionnaire.
h. Decide whether the Questionnaire can be used with Clients, Eligibility or Both Intakes.
i. The gray part of the form has two purposes: i. It is used to see ALL the codes under problem code, special problem code and national index code AND ii. By checking the box (‘Check this and rerun to show codes in use’) it can be used to show those codes or special names already used. If already used, they can’t be used for another group of questions.
j. Each Questionnaire must have a unique name or number. For example, you couldn’t have two different Questionnaire for a special code (example: 6321, lockout) that stood for lockout. If you needed another set of questions, you would create a second code (example: 6322, lockout – medicine). (You add a new Special Problem Code by going to Admin, Setup tables, Special Problem Codes.)
Note: You may not be able to determine the ‘Beginning Question Number for this Group’ since you haven’t entered any questions yet. If you are the only person setting things up, it’s likely you could use the number of the last question used (here 102) + 1 as the beginning question (103). If this turns out not to be correct, you can go back and change this number.
E. Populate the Questionnaire with Questions
Next decide on the questions you want to ask under the Questionnaire and how they will flow.
Note: There are two addendums attached to this documentation at the end that give you an example of how to structure your questions before beginning entry.
a. Write down the questions that need to be asked.
b. Decide on the type of answer that will be given: i. A Number ii. A Date iii. A Money Value iv. A Memo v. A Letter vi. Yes / No vii. A List
c. The Question Build form is where you put in the question and decide on the action to take based upon the client’s answer. Note: You MUST add a question here to proceed to the other tabs. If you want to edit a question, use the edit choice.
This is what you see if you pick ‘Open Question Builder’ after selecting a Questionnaire.
Clicking on ‘Edit Question’ button gives you the information about the question that has the selection arrow next to it.
d. Determine the branching for a particular answer. The questions do not follow a linear order, but can jump around and loop back based upon the answer given by the interviewee. The answer can be a simple yes/no answer or more complex, such as fitting the answer into a range of income. If so, enter that test as a single value, e.g., $150, or as a range, e.g., 1/1/23-6/1/23. (The value field does not show above, since it is a Yes/No answer.) That way the answer can be compared to the test range. For example, the question might read, “To qualify, your income must fall within a certain range. What is your income?”
e. The type of question and answer determines the types of actions that can be taken. i. Memo fields never branch but always go to either: (1) Path 1 (2) To the end of the interview ii. Yes/No answer. The Administrator can decide to: (1) Always go to Path 1 (2) Go to Path 1 if Yes, Path 2 if No, (3) Go to the end of the Interview after the answer. (4) If you want Path 2 if Yes, you can’t. However, merely reverse your question so the No answer sends you there. For example, change: Did you get a high school education? If No go to 60 if Yes go to 65 To Did you get a high school education? If Yes go to 65 if No go to 60 iii. Number or dollar field: (1) Always go to a particular question (Path1) (2) Go to Path 1 if the answer is Yes, Equal To or Falls Inside of a Range, otherwise go to Path 2 (3) Go to Path 1 if the answer is Less Than or Less Than a Range, otherwise go to Path 2 (4) Go to Path 1 if the answer is Greater Than or Greater Than a Range, otherwise go to Path 2 (5) Go to the End of the Interview
iv. If the answer is a List (multiple choice), there is only one choice or path to go to for each list member. This is determined by the answer chosen. However, there can be a different path for each answer in the list.
For example, “What county do you live in?” Dependent on the client’s answer, they could be directed to different advice or follow up question. Below is an example with three counties. Depending upon your answer, you would be sent to one of three follow-up questions.
Note: If your question is set to use a list for choosing answers you are prompted to go to the List Conditions Tab.
This sets where each of the list choices sends the user.
f. If you want to include advice as part of your question, you can do it by including the advice as part of the wording of the question or assign advice to the question. For example you could say “Do you owe rent? (If you do you can’t withhold rent because of needed repairs)”.
You could also attach a special Advice tab to your question. For example, “Do you owe rent?” If the client answers yes, they could be directed to a question that first displays advice about owing rent and then asks the Interviewer, “Did you provide the advice to the client?”
g. If you click on the ‘Does this question have advice associated with it?’ Check the box and tap the ‘Pick Advice’ button, it takes you to this tab. You can then find the advice you want using the Search for Word field and include it as part of the question by clicking ‘Choose’ next to the desired Advice Number.
h. Below is the second tab of the Question Builder. It shows the questions already in the system for that Questionnaire. Double clicking a questions allows you to open it up for editing. You CAN also edit the path fields directly on this page. This is very convenient for entering the numbers of the questions that follow the selected one.
i. Because the questions branch, each interview using the same Questionnaire may end up consisting of different questions. It is also possible that the questions might appear in a different order. The final interview might look quite different for each client, determined by the answers they gave. This is because the order in which questions are seen (or whether they are seen at all) is determined by the answers given by the client.
F. The Seventh Button – Generating Documents The Intelligent Intake System has the ability to generate custom documents based upon the answers given by clients during the intake process. The document that is generated can change in appearance and content based upon the answers given by the client. In order to generate a document, three things are necessary. You must have: i. An interview of the client upon which to base the document. ii. Instructions (entered by an administrator) as to what to do in the document in response to the content of the answers given by the client. iii. A template that loops though the interview’s answers and applies the instructions to put content into the resulting document.
You do not need to be a programmer to set up these documents. However, like new functions on your cell phone, you have to commit some time to learn how to use the system and add information to generate your documents.
1. A document can be generated using the Intake system in one of two places: b. On the review sheet that appears at the end of the interview. c. On the Intake sheet that appears when the Intake System button is pushed on the Eligibility Slip or on the Client Intake.
2. A Document might also be intake level dependent (Clients or Eligibility) for several reasons. a. Although the Intake might be used for either clients or applicants, the generated document might only be useful for a particular level. For example generating an acceptance letter from an Intake when the person is already a client is useless and confusing. b. The document’s template might depend upon the level of intake for facts included in the document. For example, a document might need to use the disability field, which is not available on the Eligibility slip. c. For these reasons, there is an ability to mark i. A Questionnaire of Questions as being useful for Clients, Eligibility or Both. ii. A Document as being useful for Clients, Eligibility or Both.
3. How a Document Gets Content The document gets content using the utilities provided the administrator on the form titled “Intelligent Intake Administration”.
G. Add Document The Add Document button first opens up a ‘cover’ page to describe the document you are creating. You enter: a. Who is creating it b. What set of questions (Questionnaire) does it apply to c. What type of document is it d. What is the short name for the document e. What template is used f. What is the starting question number of the fixed group (list of questions) that it is based on? (You may not know this until you start putting in the questions.)
H. Once this is done you click the Begin the Document button. a. You then choose the question you want to build an action for. With a new document, you should begin on the first question and work through to the last.
b. You then choose what action you want to take based upon the answer i. If the answer is Yes do 1, else do 2. (There are variations on this where the answer is a date, dollar figure, etc.) ii. Do nothing iii. Always do 1 c. The next step is setting what the Actions are. You can: i. Add a Paragraph ii. Add the client’s answer in a paragraph or by itself d. Putting [v] embeds the client’s answer in the paragraph, for example if the client’s answer was, “I am sick,” a paragraph saying this: The client said, “[v]”. Would result in a paragraph in your document that said this. The client said, “I am sick”. e. You would then click the Save/New Action button to set the action for the next question. f. The ‘For Reference’ section shows the question you are working on and the actions that occur depending on the client’s answer. g. The treatment of Lists (Multiple Choice) Because an answer that uses Lists to choose from is more complicated, setting the action to take is also more complicated. Here we have a list of counties from a different Questionnaire (set of questions). We can set what happens in the letter based upon what selection in the list was made. In the example below, selecting: Cabell Results in a paragraph added that says. “You told us you live in Cabell”
A list selection can only have one action, which is to include the paragraph entered. Of course you could choose to do nothing as mentioned above.
h. Resulting Document Here is a selection from the resulting letter. Remember, what is said here could easily be changed by editing the actions as show above. It will also change dependent upon the client’s answers to the questions. For example, if the property was not in Tennessee, the letter would have only a single paragraph saying: “Since the property isn’t in the state, we can’t help you. Check for legal aid in the other state.”
4. This section looks at two templates provided with the system. The first is general letter and the second is a VERY simple pleading. a. The templates have certain things in common. 1. Each is an Access Report. This gives us the ability to loop through the data while also generating a document the content of which is dependent on the client’s answers. It also means that it can be exported to a Word document. 2. Because of the complexity of the code behind the template, it is probably best to modify an existing template to fit your needs rather than to try and start from scratch and build a new one. b. The contents put into the document can come from several sources: 1. The setup of the document as done by the Administrator using the tools provided under the Administrative Menu. This is reviewed above. 2. It can be placed on the document directly, such as by adding fixed paragraphs, labels, graphics, etc. 3. It can get values from the record source of the document. For example, the client’s gender could be used if the document had the ClientsW table in its record source (as either a part of a query or just as a table). 4. The document can prompt you for particular pieces of information. c. The Letter Template 1. This uses the letterhead from your form letters in Prime. Many of the fields are also identical. 2. It addresses the letter based upon the contents of the client’s intake. For example, if sex is ‘M’, it uses Mr. as the client’s title, otherwise it uses Ms. 3. Sincerely is a label. To change it, you can click in the box and put in ‘Yours Truly’ instead. 4. The red fields are invisible and used to set the values in the letter. 5. The setup answers are put into the area that says =Mypara(). d. The Pleading Template 1. By putting a phrase inside a pair of brackets, the user is prompted for the value to put in the pleading. In this template the user is prompted for “What County Court?” and also for “What is the Nature of the Action”. The user’s responses are included in the document. 2. The red fields are invisible and used to put the answers in the document. These appear in =Mypara().
e. Here is the resulting document.
2. Documents can be generated at the end of doing an interview or afterwards by reopening the intake. a. End of the Interview
b. Reopening the Intake
3. Code behind the forms
The code behind the templates is quite complicated because it must provide for seven different types of answers (memo, letter, date, yes/no, etc.). It also has to take into account the client’s actual answer, e.g., did the user answer more than the set amount of money used as a criteria or less than or equal to the amount, etc.?
a. Administrators need to do this when constructing a Document i. Determine the type of document. There are any number of types of documents that can be built and used in the Intake System. These include: Letters to send to clients or others Summary of the Interview Advice forms to give to clients based on their answers Pleadings for court Application forms Follow-up documents requesting more information based on their answers
j. This is the cover sheet for building paragraphs on a document.
k. Determine which Questionnaire of questions will be used.
l. Go through and determine what action will be taken as a result of the response to each question. i. Do Nothing ii. Always Do Choice 1 iii. Do choice 1 if the answer is Yes, equal to or within the range of the test, otherwise do Choice 2.
m. Choose a Template to Apply or construct one and add it to the list of Templates. A template is an Access Report that goes through the questions and answers and adds things to the document dependent upon the client’s answer. Below is the template for constructing a form letter. It puts in the client’s address and then proceeds to populate the letter with paragraphs that are set by the above form and the client’s answer.
V. Objects in the Intake System A. Tables a. InActionTake This determines what action is taken in response to a question. i. Action Applies To Field (1) COM applies to all questions, except Yes or No, (2) All applies to all questions and (3) YON applies to just Yes or No Answers.
Contents of the InActionTake Table Field ActionLetter ActionText ActionOrder ActionAppliesTo EEQ Go to Path 1 if Equal to the Entry or within the Range - Else Path 2 1 COM EGT Go to Path 1 if Greater Than the Entry or Range - Else Path 2 2 COM ELT Go to Path 1 if Less Than the Entry or Range - Else Path 2 3 COM Y12 Go to Path 1 if Yes, Path 2 if No 4 YON EP1 Always go to the Path 1 Question 5 ALL END End the Interview upon completion of this question 6 ALL
b. InActionTakeDocList This holds a list of Document actions that need to be taken when a certain answer is given to a LIST question. i. The Document ID ii. The Question Num iii. The LISD (the list ID number of the selection, such as Cabell County) iv. The Document Build Action v. The Document Build Paragraph 1
c. InActionTakeList The actions taken during the interview that show what the next step will be if a certain answer is chosen from the list. Unlike the normal question, an answer to a list answer can only have one action. This action is to go to a particular question. Each record in this table holds the possible answer to a question and the number of the next question if that answer is selected. For example, a list of counties might provide the following actions to take based upon the client’s answer: Cabell go to question 5 Fulton go to question 6 Washington go to question 7.
d. InAdvice Holds advice that can be linked to specific questions. One piece of advice can be linked to multiple questions. If a question is linked to a piece of advice, the advice is displayed BEFORE the question is displayed. The advice held in this table is COPIED into the answer, since the advice might change over time.
e. InAnswers This table holds: a) A unique identifying number b) The Interview number c) The case number d) The Question number e) The Client’s answer, either a number, letter, dollar amount, memo, date, Y/N or a selection from a list. f) Advice given to the client, along with the issue the advice is based on. g) Any prompt provided to the question, such as a definition of what an heir to property is.
f. InDocBuild This holds the instructions on how to build the document in response to the client’s answers. It includes: i. A Unique number ii. The Question number iii. The number of the document it applies to iv. The Questionnaire it applies to. v. The Action to take dependent on the question vi. The action to take based on the answer vii. Paragraph 1 that can be inserted viii. Paragraph 2 that can be inserted
g. InDocTemplates This holds the list of document templates that will use the client’s answers, InDocBuild table and the list of questions to build the document.
h. InDocuments This is the definition table for each document constructed. It contains: i. The document type ii. A comment describing the document iii. The Questionnaire it is dependent on. iv. The beginning number of the Questionnaire v. The staff number of the person who created it vi. The Template name it uses vii. Where the document can be used (Clients, Eligibility, Both)
i. InFixedGroup This is the definition table for the Questionnaires (groups of questions). It contains: i. The Questionnaire number or name ii. The description iii. The beginning number of the Questionnaire the group starts with iv. Where the Questionnaire of questions can be used (Clients, Eligibility, Both)
j. InInterview This is the definition table for the interview. It contains: i. The interview number ii. The case number of the case iii. The staff number who did the interview iv. The date of the interview v. An optional comment about the interview vi. Whether the interviewee is the client vii. If NOT the client, name, address, phone and relationship to the client of the person who is being interviewed viii. The Questionnaire of questions used for the interview ix. The beginning number of the question that starts the interview x. An Optional Ending comment about the interview xi. A letter representing where the interview originated, Clients or Eligibility (C or E)
k. InQuestions This contains: i. A Unique number ii. The Questionnaire the question belongs to iii. The question iv. The Type of answer, e.g., Memo v. The Question number of Path 1 vi. The Question number of Path 2 vii. Any values to test the client’s answer against, such as a date or dollar amount viii. Any prompt to display ix. The Action to take based on the answer x. The Advice number to be displayed before the question is. B. Forms a. FInDocLetter This form allows the choice of who signs the letter and the letterhead to use. It also sets the document to use.
b. FInterviewsOnCase Form that shows up when the Intake System is selected on the Client Intake. Lists old interviews on the case and allows the users a series of options, such as starting a new interview, generating documents, going to an old interview, etc.
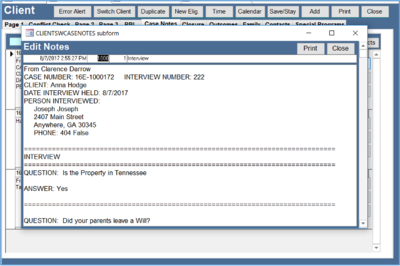
c. FQInInterview The sub form that lists the information about the interview, who was interviewed, the questions and answers. Used on the review sheet, inpINInterviewReview, that appears at the end of the interview.
d. inpInActionTakeListsub Sub form that allows the administrator to set the action to take when a particular list value is selected as an answer when generating a document. Shows up as sub form on inpINQuestions.
e. InpInAdmin The Administrative switchboard for managing the intake system.
f. inpInAnswers This is the form filled out by the Interviewer after filling out the introduction to the interview page identifying who is being interviewed, etc. This holds the question and allows the interviewer to enter the Answers, see the prompt, see the advice and enter a comment that refers to the question.
g. InpInCodeHelp This form provides help by displaying the usual codes used in the Intake System and what they mean.
h. inpInDocBuildQ Sub form that is used to provide help when setting the action to take in a document generated by the Intake System. It allows the administrator to see the whole question and see where the user is sent dependent upon their answer. It shows up on inpInDocumentBuild
i. inpInDocument The introduction to the document building that includes the name of the document, the beginning question number, when it was built, type and name of the document and the Questionnaire it belongs to.
j. inpInDocumentBuild This is the form filled out after filling out the introduction to the document, inpInDocument. It builds the steps to take in the document based on the questions and the client’s answers. There should be a form filled out for each question in the Questionnaire telling the system what to do on the document based on the Clients Answer.
k. inpInDocumentBuildsub Part of the inpinDocumentBuild form, this subform is where the instructions on how to handle the List questions in a document is set up. It remains invisible until a List type question is chosen.
l. inpInFixedGroup The introduction form filled out before developing the questions. It defines the name of the group, when it was created, who created it and other basic information.
m. inpInInterview The introduction form filled out before beginning the actual questions in the interview. It links the interview to the case, defines who is being interviewed, allows a conflict check and defines the Questionnaire of questions that will be used for the questions.
n. inpInInterviewReview This is the review sheet that appears at the end of an interview. It allow the user to review the answers, enter a closing note about the interview, send the interview to their case notes, generate a document or print out the interview.
o. inpInInterviewssrch Search form that allows the administrator to find a particular interview with its questions and answers. The display can be limited to just the questions and answers of that interview by double clicking on any of the answers from the interview. The user can also move to the client intake to review it.
p. inpInPickAdvice This form, available while building questions, allows the user to link a piece of advice to a particular question. Additional advice can also be added using this form.
q. inpInQuestions Questions are entered and defined here. This links the question back to a particular Questionnaire. This is where the content of the question, actions taken, format of the answer, the prompt and other features of a question are entered.
r. inpInQuestionssrch A screen used to locate a question. This allows the user to see all the questions under a particular group. Double clicking opens up a form allowing the question to be edited and saved.
s. inpInQuestionssub A subform on the inpInQuestions form allowing users to review the questions in a Questionnaire and switch to and edit a different one.
t. srchInQuestions A traditional search screen used to locate a question. This allows the user to see all the questions under a particular group. It also allows you to see where the question links to another question, depending on the answer of the interviewee. Double clicking opens up a form allows the question to be edited and saved. This is called from the InpInAdmin form.
u. srchIntakeSystem A traditional search screen used to locate an interview. This allows the user to see all the interviews in the system and what client they belong to. Double clicking opens up the case that the interview belongs to. This shows up on the Ribbon Bar and Touch Tiles under Client information.
v. Code behind the form inpClients ‘Intake System’ button The button added to the Tools Tab or Page 2 of the inpClients form for older versions opens the intake system. It has the following code. Private Sub Command426_Click() On Error GoTo p_err DoCmd.RunCommand acCmdSaveRecord DoCmd.OpenForm "FInInterviewsOnCase" Forms!FInInterviewsOnCase!CASENUM = Me!CASENUM Forms!FInInterviewsOnCase!IntakeOriginTmp = "C" Forms!FInInterviewsOnCase.Recalc Exit Sub p_err: MsgBox Error$ MsgBox "There was an error saving your intake. You must correct it before you can proceed to the intake system!" End Sub
w. Code behind the form inpEligibility ‘Intake System’button The button added to Page 1 of the inpEligibility form opens the intake system. It has the following code. Private Sub Command426_Click() On Error GoTo p_err DoCmd.RunCommand acCmdSaveRecord DoCmd.OpenForm "FInInterviewsOnCase" Forms!FInInterviewsOnCase!CASENUM = Me!CASENUM Forms!FInInterviewsOnCase!IntakeOriginTmp = "E" Forms!FInInterviewsOnCase.Recalc Exit Sub p_err: MsgBox Error$ MsgBox "There was an error saving your intake. You must correct it before you can proceed to the intake system!" End Sub
C. Reports – These are the Templates for producing documents, C and E in the name designates where the document is used, for example TC is for the Client Intake and TE is for the Eligibility Intake
a. RInDocTEGeneric and RInDocTCGeneric This is a generic template that generates a summary of the interview based upon the information in the InDocBuild table. It could be
b. RInDocTELetter and RInDocTELetter This is a generic letter template that can be used to create customized letters based upon an interview. It can be used for an opening letter and is provided with example data showing how this is done. It is set up to read the information from InDocBuild table and include information in the letter based upon that table.
c. RInDocTEPleadingGeneric and RInDocTCPleadingGeneric This is a generic pleading template that can be used to create customized pleadings based upon an interview. There is example data showing how this is done. It is set up to read the information from InDocBuild table and include information in the pleading based upon that table. It is set to prompt for the county and the type of action, but this could be either gathered from the interview or the client information.
d. RInDocTELetterToPrompt and RInDocTCLetterToPrompt A generic letter that allows the user to be prompted for the name of the person the letter should be sent to, the address, city, state and zip.
e. RInInterviewPrintE and RInInterviewPrintC This report provides a printout of the interview with signature lines for both the interviewee and interviewer. Both of this can be made invisible or ignored if you don’t wish to use them.
f. RInInterQuesPrint Used to print out the Questionnaire of Questions from the Intake System Admin Page.
g. RInInterQuesPrintsub Sub Form on the above Report
D. Queries The error checking queries can be run off of the Admin Screen for the Intake System and there is a tab on the Question builder that allows you to run them.
a. QInAnswerQnumNotMatchQs Error Checking, finds Answer records that don’t match any questions
b. QInErrorCheckQuestionsNotUsed Error Checking, finds Questions not used with any Questionnaires
c. QInErrorCheckUsedQuestionNumbers Error Checking, finds a list of question numbers that are used in Questionnaires
d. QINErrorIntNoAnswers Error Checking provides a list of interviews that have no answers associated with them.
e. QInErrorNoStartingNumber Questionnaires that don’t have a starting number.
f. QInInterviewC and QInInterviewE Record Source for FQInInterview
g. QInInterviewsrch Record Source for inpInInterviewssrch
h. QsrchIntakeSystem Record Source for srchIntakeSystem
E. Modules No separate modules exist. The necessary code is behind each form or report. a. Modification to Module srchFormButtons, srchBar sub, added (the line with the number was added to give a location):
3420 Forms!inpPreferencesSetting!SNUM = pvarMyvar
'Intake System, Meetings and Court Cases
                     Case "srchIntakeSystem"
                     If Forms!srchIntakeSystem!IntakeOrigin = "C" Then
                         DoCmd.OpenForm "inpClients", , , "Casenum = """ & pvarMyvar & """"
                     Else
                         DoCmd.OpenForm "inpEligibility", , , "Casenum = """ & pvarMyvar & """"
                     End If
VI. Deleting Intakes, Questionnaires of Questions, Document Instructions In some instances you may wish to delete entries in the Intelligent Intake System. These deletions will fall into one of three groups: 1. Deleting an Intake 2. Deleting a Questionnaire of Questions 3. Deleting Document Instructions
1. Deleting an Intake – Tables affected inAnswers, inInterview
In order to delete and intake it is necessary to first identify the Intake Number. You can do this by using one of the search screens located on Intake System management screen accessed on the ribbon bar under Admin using the button or under the Admin Custom page.
A. Choose the ‘Open Interview Search” button and use the search screen to locate the interview you wish to eliminate. The 8th column over is IntNum field which identifies the interview. B. Now go to the in InAnswers table. Locate all the records that have this IntNum. Highlight them and delete them. C. Next go to the InInterview table and locate the single record with that IntNum. Select it and then delete it. Your intake is now removed. 2. Deleting a Questionnaire of Questions – Tables affected inAnswers, inInterview, inDocBuild, inDocuments, inActionTakeList, inQuestions, inFixedGroup
Deleting a Questionnaire of Questions is a bit more complicated since you should first delete any Intakes dependent on that Questionnaire. If you don’t do so, you will orphan these interviews since they will not have any questions to reference their answers to. Then you need to get rid of any instructions for generating documents for the Questionnaire.
A. Choose the ‘Open Interview Search” button and use the search screen to locate the interview you wish to eliminate. The 5th column over is IGFixed Group field which identifies group of questions the interview depends on. Delete these interviews using either a query or the steps mentioned above. B. Next go to the inDocBuild and identify the GFixedGroup you wish to eliminate and delete the records in inDocBuild. This is the 4th column over when opening the table. C. Open the InDocuments table and erase any records that have Questionnaire name in the GFixedGroup Column. D. Open the InQuestions table and find all the records with the Questionnaire name you wish to eliminate in the GFixedGroup column. If any of the questions have a LST in the QTypeAnswer column, write down the QNum of the Question. If none have a LST, skip the next instruction. E. Open the InActionTakeList table and delete the List entries that have the Qnum you identified above. F. Reopen the InQuestions table and find all the records with the Questionnaire name you wish to eliminate in the GFixedGroup column and delete them. G. Open the inFixedGroup table and delete the record that has the name of the Questionnaire you want to eliminate.
Your Questionnaire of questions, the interviews based upon them and the document generation instructions have been removed.
3. Deleting Document Instructions - Tables affected inDocBuild, inDocuments The following will delete the instructions for generating a document. Since the documents that are generated are not stored in the tables, this will NOT delete any previous documents that were generated. A. Identify the document instructions you want to delete. Open the inDocuments table and look at the list of the documents. Pick the one you want to get rid of and note the DocID. B. Open up the inDocBuild table and delete all the rows with that number in the DocID column. C. Go back to the inDocuments table and delete the row with that DocID.
Your instructions on how to generate a document have been deleted.