Web: Office 365 (O365) Email Settings
Basic Information
The Office 365 (O365) Email Settings system relies on the organization having and utilizing two things:
- An Azure Active Directory (AAD) system hosted on Microsoft Office 365 system; and,
- An Exchange Email system utilizing and connected to that AAD system.
Setup
In Azure Active Directory admin center, click on "App registrations". 
Choose "New registration". ![]()
In the "Register an application" page, enter a name, such as "Prime 16 Web User Manual Demonstration" (used in this example). For "Supported account types", choose "Accounts in this organization directory only". Click the "Register" button.
In the main page for the app registration, next to Client credentials, click the link. 
In the Certificates & secrets page, click on "New client secret". 
Enter a description for the secret, such as "Prime 16 Demo Client Secret", and choose an expiration. Make a note of this expiration and come back to create a new one shortly before that period to continue using this system. Click the "Add" button.
In the resulting page, make sure to copy the "Value" and "Secret ID" from the page. The Value is only available once. 
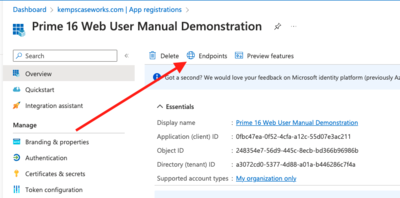
Click on "Overview" to return to the main page. Next to "Redirect URIs", click the link. ![]()
Click "Add URI" and add two new Redirect URIs. The format of these will be, for example:
https://test.kempscaseworks.com/demo_prime16/o365/o365login.aspx and https://demo.kempscaseworks.com/prime16/o365/o365login.aspx. Only using your organization's test and production URI values.
Save these new entries and return to the Overview.
Click on API permissions and "Add a permission". Add the following:

Follow the "Register service principals in Exchange" of the web page found here https://learn.microsoft.com/en-us/exchange/client-developer/legacy-protocols/how-to-authenticate-an-imap-pop-smtp-application-by-using-oauth
SPECIAL NOTE: Do not give access to one mailbox. Only register an Azure AD application service principal in Exchange.
Return to the Overview page for the app registration.
In Prime, make the following entries in the Office 365 (O365) Administrative page:
In the RedirectURI, enter the production URI value, such as: https://test.kempscaseworks.com/demo_prime16/o365/o365login.aspx For theClientID, enter the Application (client) ID from the app registration overview page. For clientSecret, enter the client secret value that you created and copied earlier. For scope, enter: https://outlook.office.com/IMAP.AccessAsUser.All%20offline_access%20email%20openid In authUri and tokenUri, copy values from the "Endpoints" option of the Overview page:


Save these entries.
If you need help with this setup, let us know. We are happy to help you through the process.
Staff Settings
For staff, open the admin staff edit page and make the following entries:
In the "Email Setup" page:
Enter the staff person's Email name, email server username (email address), and a "junk" password, such as "NothingHere".
Check the checkbox next to "Use Office 365 System".
If they will be able to use a shared mailbox, enter the "Send as Email Address", such as intake@organizationdomain.org and a shared email name in the "Send as Email Name", such as Intake Shared Mailbox.