A2J Version 6 Online Intake
Overview
With the release of A2J Version 6, it was time for an update and expansion of the Prime A2J Online Intake System. The Prime A2J Version 6 Online Intake System (PAOIS) has been heavily modified from the original version in many ways and performs much better in terms of its setup and import of the A2J Version 6 interview answers. In addition, many features of the website are controlled from within the regular Prime user system, removing the need to modify the website manually.
Some of the new features include the ability to see the data type of the variables the A2J interview provides. When variables are assigned to a field in the ScreeningX table, you will be able to see a comparison of the A2J variable datatype versus the ScreeningX field datatype. So, you will know from the start that you are not trying to put a string (e.g., “November”) in a number field (e.g., 12).
Another new feature in the import algorithm checks the data of each variable against the field datatype. If the data coming in is not an appropriate type, the system will copy the data to the reviewer’s notes for later consideration. As an example, say you have a variable in A2J that holds a string, for example you asked the applicant for their last name. They entered “Smith”. If you accidentally assigned that to the birthdate field, the system would be able to tell that would not work. In the reviewer’s notes, an entry would appear showing: “Birthdate: Smith”.
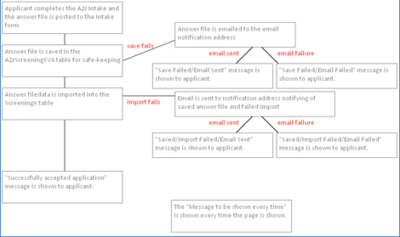
The system heavily logs applications, starting with saving the A2J answer file, working through the variables, and attempting an import. Additionally, at many stages, if something goes wrong, it will attempt to send an email to staff with information about the problem and may even include a copy of the answer file.
Setup
To begin, open the Prime A2J V6 Online Intake System from the Administration menu (this may appear under 'Custom Admin' => 'A2J V6 Import Setup'):


Click “Website Settings” to set many of the items that will be used to interact with the applicant. The “Settings” tab contains the items that must be entered for the website to work properly. Each item must have an entry.
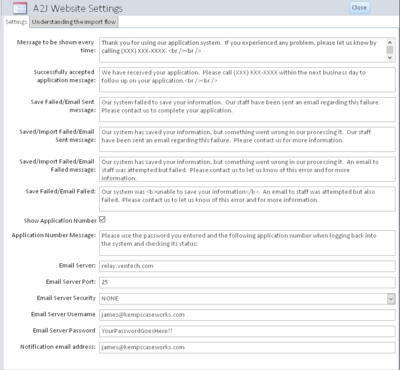

For each message in the website settings page, you may use HTML coding as you may desire. So, for example, if you want the word “please” to appear in bold, you might enter please in the message field. Each message is shown below, together with a description of when it appears:
The “Message to be shown every time” is a message that is shown after an applicant finishes the A2J intake and the answer file is posted to the web page. Whether the system can successfully deal with the answer file or not, this message is always shown. This entry might contain information about the organization, office hours, telephone numbers, etc.
The “Successfully accepted application message” is shown when the A2J answer has been imported into the ScreeningX table. This allows you to inform the applicant that their application has been properly received. This entry could contain instructions on what the applicant should do, if there is something they need to do to complete their application.
The “Save Failed/Email Sent message” is shown when the A2J answer couldn’t be saved, but an email was successfully sent to staff regarding the problem.
The “Saved/Import Failed/Email Sent message” is shown when the A2J answer was saved, but importing the data didn’t work. An email was successfully sent to staff about the problem. This entry could contain information about what the applicant should do: call the office and report the problem, wait two days to hear from us and then call, or something else.
The “Saved/Import Failed/Email Failed message” is shown when the A2J answer was saved, but importing and sending an email to staff both failed. Here again, this entry could contain instructions for the applicant.
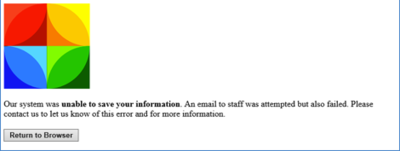
The “Save Failed/Email Failed” message is shown when there has been some type of catastrophic failure: the A2J answers didn’t save, weren’t imported, and an email to staff also failed. About the only time this error should ever be hit is in the event your database is offline (for some purpose) and the email system is not working. This entry might instruct the applicant to call in to make an application.
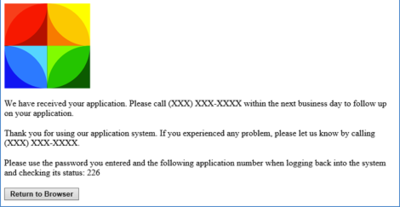
If you decide you want to allow applicants the ability to log back on to the system to see the status of their application, you must ask for them to enter a password in the interview and enter that value in the “AppPassword” field, and also make sure their entry checks the “LogBack” field. When the “Show Application Number” box is checked, if the application is successfully imported, the final screen will also include the “Application Number Message” and the application ID they will need to log back in.
To email staff when errors occur, appropriate entries must be made in the Email Server portion of the setup page:
Email Server: the server name or IP address Email Server Port: the port to use to send the email Email Server Security: what security your email server requires: TLS, SSL, or NONE Email Server Username: the username to use to log on to the email server Email Server Password: the password to use to log on to the email server Notification email address: the email address to which the error notice should be sent
For the notification email address, we suggest this be an email group, so that an email to this single address is received by several staff in the organization. Although sending an email to a single individual will work, we believe that setup can leave the organization in a problematic situation should that person leave the organization and the address here not be changed. In that event, no one would receive error notices.
If you switch to the “Understanding the import flow” tab, you will see a graphical representation of how the system deals with A2J intake data:

Close the “A2J Website Settings” form to return to the main A2J setup form.
To setup the system to know how to deal with the data it receives from the A2J intake, the system must first see a copy of your A2J intake to know what variables it should expect and where to place them. Note: you don’t need to reimport the A2J intake unless you have made a change to it. If you have already imported it and need to review or make changes as to where the data goes, skip directly to step 6.
1. Import your A2J Online Intake XML file. Do that by clicking the “Select XML File” button. In the dialog box that pops up, navigate to and select the XML file. For a newer A2J Version 6 interview, that may appear in the “default” folder of the “guides” folder of the A2J website. Once the XML file is selected, proceed to step 2. 2. Click the “Get variables” button to have the system work through the XML to find the variables in the interview. When it does that, it will put the variables it finds into the box in step 3. 3. Review the variables the system has found. If there are variables you have put into the A2J interview that don’t show here, make sure you selected the appropriate XML file and review the A2J interview. They should all be shown here. 4. Press the “Insert Variables” button to add new variables to the system. This is important in new A2J intakes or where you have modified the intake and added new variables. Only the variables that are new are added to the system. Existing ones are skipped, so if they already have settings associated with them, they will remain. 5. Press the “Delete Variables” button to delete variables that were in a previous version of the A2J intake, but do not appear in the newest version. Leaving variables, especially where they were assigned to be imported, can be a source of errors. 6. Press the “Map Variables” button to go to the new variable mapping form. In this form, the variable and its apparent type are shown on the left:
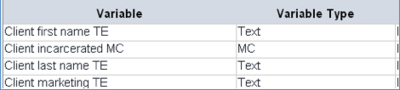

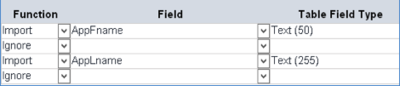
Next is the “function”—that’s what you want done with each variable that comes in from A2J. The options are “Ignore”, the default entry. If set to ignore, the A2J intake can send in data in that variable, but the system will just ignore it, essentially discarding that data. The other option is “Import”. When set to import, the system will look for and operate on data provided in that variable:


To the right, the “Field” is a list of all fields in the ScreeningX table. If you choose to import a variable, you must select the field to which you want it imported. On the right of the “Field” is the “Table Field Type”. When you choose a field, it will show you its field type, allowing you to compare the variable data type with the table’s field type:

When you have made your selections, press the “Check for Problems” button at the top of the screen. This will check for obvious errors in your setup, including the following errors: (1) where multiple variables are set to import to the same field (e.g., trying to import Client First Name and Client Address to the First Name field), (2) where you have chosen to import a variable, but don’t have it importing to any field, (3) where you have chosen to ignore a variable, but you have selected a field for it, and (4) where you have chosen to import a variable to the ‘ReviewersNotes’ field—this is a protected field and should not be used for any data import.
Click “Close” to return to the main setup screen.
Dealing With Errors
With all the error checking and error handling that has been built into the system, errors have been reduced to an absolute minimum. If an error is encountered the system will log the problem in the A2JLog table. Review this log occasionally looking for “Warning” and “Severe” issues. These can help you identify where you may have problems with your settings (such as trying to put a string into a date field).
When the problem is related to saving the A2J answers (the first step in the process—a safekeeping task), the email sent contains the A2J answer file. In this event, the A2J answer file may have to be reviewed manually in combination with the logs to determine the problem.
If the A2J answer file is saved, but something goes wrong with the import, you can use the system to review the A2J answer and associated problems. From within the Intake System settings page, click on the “A2JScreeningXV6 Search Screen” button. That brings up a search screen of the saved A2J answers.
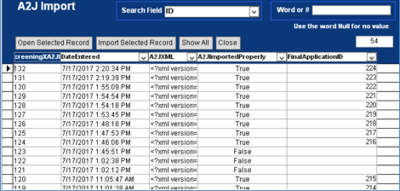

Where the data was imported to the ScreeningX table, the “A2JImportedProperly” box will show “True”. Where the data did not get imported properly, the box will show False.
Selecting an item and clicking on “Open Selected Record” will bring up the specifics about the A2J answer record:
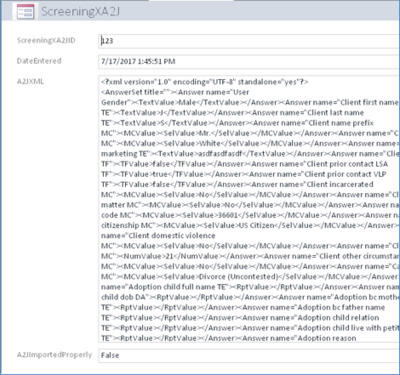

You can review the XML answer file sent by the A2J system.
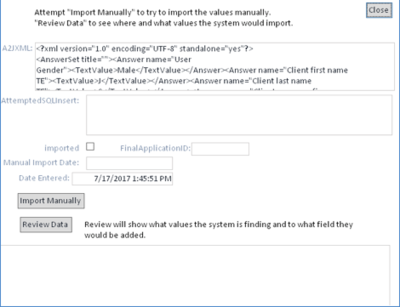
Close this page to return to the search screen. When you have chosen a record and click the “Import Selected Record” button, you are shown much of the same information, but have the opportunity to interact with the data:

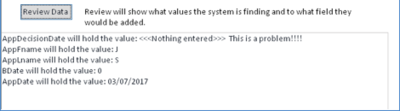
Click on the “Review Data” to see what data the system believes should be imported and where it should be imported. This can help in figuring out where your import settings may be misset:

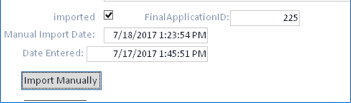
Finally, if you click the “Import Manually” button, the system will attempt to import the XML answer file again. If successful, the imported checkbox is checked, the final application ID is entered, and the manual import date is entered:

Application System
This page shows a successful application (the application answer was saved and imported properly). The first paragraph is the “Successfully accepted application message”, followed by the “Message to be shown every time”, followed by the “Application Number Message.”

Here’s an example of what is displayed if the A2J interview data doesn’t save and an email also fails:

A generic note is shown if an A2J interview answer file is not included in the page call:

Requirements
Prime 14 or Prime 16 is required for the Prime A2J Version 6 Online Intake System. An A2J Version 6 interview is not provided and must be developed by the organization for use in the website.
For users hosted within Venture Technologies, all requirements are met and taken care of for you (with the exception of email requirements).
For self-hosted users, you must have a system with SQL Server 2012, 2014, or 2016. Your Access version must be version 2013 or 2016. Your A2J website must be set up and working prior to the installation of the Prime A2J Version 6 Online Intake System. You may access the file necessary to run your own A2J Website here: https://github.com/CCALI/A2JViewer
For the Prime A2J Version 6 Online Intake System, a Microsoft Windows Server 2012 R2 system with web services, and items necessary to run an ASPX, forms-based website must be available including such roles as .NET Framework 4.5 and ASP.NET 4.5. The SQL Server and web server must be on the same LAN.
Your A2J website must be set to post the A2J interview answer file to the “saveData.aspx” page of the Prime A2J Version 6 Online Intake System.
Email notification takes place using your organization’s email system. An appropriate SMTP email server, together with an account that can be used to send email, is required to provide that feature. See the screen shots in website settings for more information.