Modify the Quick Start Menu

We discussed, in an earlier post, how to make modifications to the Touch Tiles menu. However, the menu you’d most likely be involved with is the Quick Start Menu. This is the menu that is used by law students, volunteers and also by staff who don’t use many features. What I plan to do in this article is to show you three useful things.
1. Setting up a person to use the Quick Start menu
2. How to remove a feature
3. How to add a feature
Some things to know
The name of the form that is the Quick Start menu is: mnuQuickStart
1. Setting up a person to use the Quick Start menu
There are three ways to set up a person to use the Quick Start Menu.
a. Modify the person’s preferences using the form under Admin
b. Modify people’s preferences by modifying the table directly
c. Modify people’s preferences with a query (I am not going to show this).
a. Modify the person’s preferences using the form under Admin
To change one person’s preferences, go to the Admin Screen, choose Staff Settings and then pick the Staff Roles choice.
i. Select the person you want to change by clicking on their name at the left.
ii. When their form comes up, go to the Menu choice and choose 4 under the Start Menu pull-down
iii. Press SAVE to save your choice and then choose another person and repeat the process.

b. Modify peoples preferences by modifying the table directly
i. Open the Smember table
ii. Find the row of the employee that should use the Quick Start menu
iii. For a long list, right click on the last name of any person, choose Text Filters, choose Contains and type in their name.
iv. Scroll to the right till you see the field StartMenu and put in a number 4 under it
v. Press the orange Filtered button at the bottom of the screen to show all staff again
vi. Go to the next person

![]()
c. Modify people’s preferences with a query (I am not going to show this).
Because Update Queries are so dangerous if they are done wrong, I am not going to walk through it but rather just describe it for more advanced users. You start by designing a query and adding the Smember table. Choose the correct staff by adding and setting up criteria using the CurrentEmploy and perhaps the SPositition fields. Add the StartMenu field and under in the Update To box put in 4. Run the query first as a Select query to test and then as an Update query to change the data.
2. How to remove a feature
The easiest way to remove a feature on the Quick Start menu is to open mnuQuickStart in the design view, select the feature by clicking on it (or surrounding it with a box), and then change the Visible property to False. Although you can still see the feature in the Design Mode, it is invisible when you open up the form normally (see 4. Below). You don’t delete objects on a form since there might be code that depends on that object. If the object isn’t there, the form throws an error.

Here we’ve multi-selected a button, a line and an arrow by holding the shift key down and clicking on them. Then we change their Visible property to No and save the form.
3. How to add a feature
Adding a feature to the QuickStart menu usually requires some simple coding. The best way to move a feature over is to copy (steal) it from another form or menu in the program.
Let’s say we want to have our law students help by adding Courts to our Database. To allow them to do that we are going to add a button to Quick Start and then steal some code to put behind it.
Open the mnuQuickStart in the design mode and then put a button on the form. You do this by choosing Design, then select the button tool and draw the button on the form. You click on the resulting button and change the Caption.
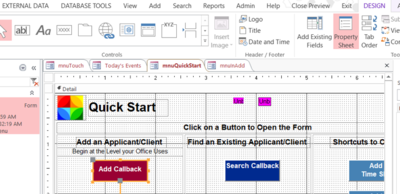

And this is the resulting button. The violet boxes are fields that have previously been made invisible.

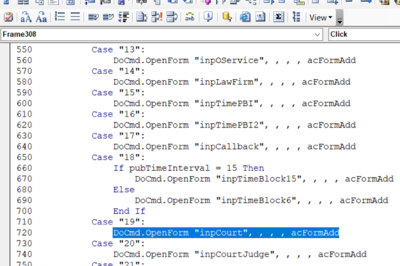
We know there are choices on the old book to add things. Open the mnuInAdd form in design mode. Click on the button that says Court. We see that it returns data of 19 (under the data tab), which means it’s a part of an option group rather than a single button. We click on the surrounding box, here in orange, which selects the option group Then go to the On Click event in properties and click on the button at the end of the row with three dots.

This opens up the code window. We find case 19 and copy just the code from it.

We go back to the Quick Start form, click on the Add Court button and then look at the Event properties for On Click. When we push the three dot button it opens the code window.

We paste our code in between the Private sub Command45_Click() and the End Sub. Save the code window and save the form.

4. Test the Changes
Now let’s test by opening the form. Notice the new button and the lack of Callback, the line and the arrow. When we press the ‘Add a Court’ button the form to add a Court opens. The changes were successful.

