Modify the Touch Tile Menu
Warning: If you incorrectly modify any of the objects listed below, you can cause the whole main menu to fail or work incorrectly. Therefore it is important you save a backup copy the form you are going to change and, to be careful, a copy of the front end. We can assist you modifying the menu. Contact us for help.
This article explains how the main Touch Tiles menu is modified. You might want to modify the menu for several reasons such as: Adding new choices to the Quick column Hiding tile choices that aren’t used Changing the labels on some of the tiles, such as ‘Begin Here’ Adding menu choices for custom features Changing what a tile does
Before beginning to modify anything, it is best to review certain things about the Touch Tiles.
1. Staff may or may not be able to use certain features based upon their permissions or roles. That means that certain tiles and ribbon bar choices will not work unless staff are given permission to use them. For example, if they are not given permission to choose the Trust Account under their roles or permissions, they won’t be able to see these options in the touch tiles or they just won’t work. They will also be locked out of choosing these options on the ribbon bar. Change a person’s permissions by going to the Ribbon Bar, Admin, Staff Settings and Staff Roles. Setting a person’s Role as Admin gives them permission to run all the choices in the system.

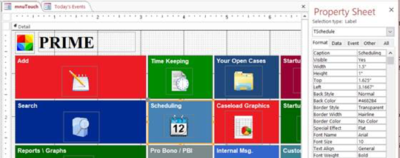
2. There are four objects that make up the Touch Tiles menu system. These can be modified to further change how the Touch Tile Menu works. a. mnuTouch is the form that displays the first page of the Touch Tiles, also called the Main Touch Tile menu. b. mnusubTouch is the single form that provides ALL of the sub forms under the main touch menu. It changes the tile names interactively, depending upon what you select on the main Touch Tiles Menu. c. subTouch is a table that controls all the labels and calls certain actions when a tile is clicked. d. Toolbarfunctions module holds the code for the actions that occur when a tile is clicked. These are functions and sub procedures. The Touch Tiles Main Menu can be modified in several ways. The first step is to open the mnuTouch or the mnusubTouch in the design mode. 1. You can change the way a tile looks, such as the colors. Click on the tile you want to change then select the color you want by clicking the fill (paint bucket) button on the top line Ribbon Bar Format menu.
2. Icons can be replaced. However, be sure the same function is called from the On Click event of the icon as from the On Click event of the Touch Tile. This is necessary since the user might click on the icon rather than the tile around the outside. This code occurs behind the On Click event.
3. The tiles on the mnuTouch form (the main menu) can be made invisible the same way you make fields invisible on forms. You click on them so they are selected. You then look at their properties either under the All or the Format tab. Find the one called Visible, look at the box next to it that says True and change it to False. Do the same for the icon. They will now not appear when you open the menu on start or from the Ribbon Bar View choice.

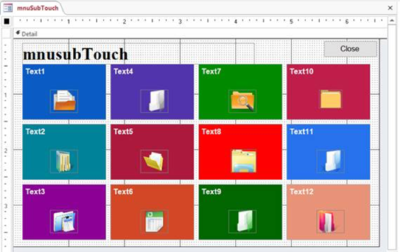
4. You cannot make tiles invisible on the mnusubTouch menu the same way. This is because the tiles are reused and changed each time you make a selection that requires the sub menu to be displayed. For example, if you click on the Add tile from the Touch Tiles Main Menu a sub form shows up. If you close and then choose Search, the same form comes up with different selections. Making a tile invisible under the Add selection would cause a totally unintended tile to be made invisible when you click on the Search tile. This is what the sub menu looks like in the design mode. Which tiles show depend upon how many selections are available under the sub menu choice, and this can vary from one to twelve.

5. Modifying the subTouch table is the primary way to modify the touch tiles for a sub menu and is probably the easiest. This paper will concentrate on explaining how to use this table to relabel tiles, shut them off and retask them for other uses.
6. Changing the ToolbarFunctions module requires programming with Visual Basic code. It is thus beyond the scope of this article and beyond the skills of most users.
7. Additional choices can be added to the Quick column or the existing ones changed.
Modifying the subTouch Table
Many things can be changed in the sub menus by changing the entries in the subTouch table. Let’s look at some of the things that can be changed. This is a selection from the subTouch table.
![]()
1. Finding the tile you want to change To modify a tile using the table, you first need to find the row that controls the tile. Right click on entry in the ObjectDescription column. Then choose Text Filter from the menu that appears and select Contains. You can then type in the label that appears on the tile you want to modify. For example you could look for ‘Eligibility New’.

![]()
2. Shutting off a tile How you shut off a tile depends on whether you want to do it on the Main Touch Tile Menu or on a sub menu. a. Main Menu – To shut off a tile or make it invisible on the main menu, you will have to use the Visible property as discussed above. b. subMenus – It is easier to shut off a menu choice on a sub menu. The above screen shot shows the last field is named CurrentR. If the -1 is changed to a 0, the tile will not show up on menu. The other menu choices will shift to fill in the missing choice.
3. Changing the label of a tile a. Main Menu – Click on the Tile you want to change and then either change its label using its Caption property or backspace over the label characters and change it. b. subMenus – You merely change the words under ObjectDescription in the table. For example, you could change the label to ‘Start Here – Eligibility New’
4. Changing what a tile does a. Main Menu – The tiles on the main menu can either call a submenu or do something directly, like open a form. To change what a tile does, while in the design click on it and look at the Event property. This controls what the tile does when clicked. b. subMenus – Decide what the row in the tale does now and compare it to what you now want the table to do. If the desired action is similar, this makes the change easier.
For example, we might want to pull up the intake screen for Other Services rather the Eligibility Slip. First we would change the Caption of the tile by changing the words under the ObjectDescription in the table. Second, since the choice adds an eligibility record, we could change inpEligibility to inpOService in the ObjectName field. Then change the objectDescription to ‘Add an Other Services record’. Since the previous eligibility entry added an eligibility record, this would open the Other Services form in an add mode.
If the existing choice doesn’t do the same thing you want the changed one to do, you need to find a tile that does a similar thing. Look at the table entries from the subTouch table for a tile that does a similar thing. Then change the contents of the row in the table to match those entries, modified to do what you want it to do.
5. Modifying or Adding a Tile to the Quick function a. To modify a tile in the Quick column, proceed the way that you did under 4.a. above. b. To add a new Tile, select a tile in the Quick column, copy it and then paste it on the screen. Move the tile where you want it to show up. You may also want to change the size. Next change the color of the tile and the label to reflect what you want it to do. Lastly you need to add code to the choice under the On Click event. This could either be an existing call that exists in the ToolbarsFunction such as: Call TileAction("TClientSearch") Or it could be direct code that opens the form, query or report directly, such as: DoCmd.OpenForm "srchClientsQuick", , , "casenum = ""ml""", acFormEdit If you open the ToolbarsFunctions module in the design mode, you can see a list of these command lines. 6. Modifying or Adding a Tile to the Quick function a. To modify a tile in the Quick column, proceed the way that you did under 4.a. above. b. To add a new Tile, select a tile in the Quick column, copy it and then paste it on the screen. Move the tile where you want it to show up. You may also want to change the size. Next change the color of the tile and the label to reflect what you want it to do. Lastly you need to add code to the choice under the On Click event. This could either be an existing call that exists in the ToolbarsFunction such as: Call TileAction("TClientSearch") Or it could be direct code that opens the form, query or report directly, such as: DoCmd.OpenForm "srchClientsQuick", , , "casenum = ""ml""", acFormEdit If you open the ToolbarsFunctions module in the design mode, you can see a list of these command lines.