Online Intake Version 16
Overview
The Online Intake Version 16 makes use of some of the latest technologies available to provide a smooth, easy online intake for mobile users. Uses across many devices will see a varying version of the online intake that is redesigned visually to appear seamlessly in their browser. Full desktop users will see the expanded version of the website; whereas, mobile users get a reduced version of the website.
Pages within the online intake have been redesigned to allow for clear and logically-grouped question presentation. Prior versions of the online intake system had seven pages for the applicant to move through. This redesigned system has been reduced to five (5) pages of questions and additional error-checking has been built into forms.
As with the previous version of online intake, data entered by an applicant is stored in a separate, password-protected system to allow your organization to check for conflicts and other requirements before adding the applicant to your regular intake/client system.
Setup
Most setup is already done for you. You may wish to modify the information in the online intake system to fit your organization’s desires and needs. For example, the headings for the normal intake and mobile intake pages may be changed to reflect the organizations name:

Figure 1 - Example of the normal intake page header


Figure 2 - Example of the mobile intake page header
Your organization will also, undoubtedly, wish to customize the terms and conditions page:
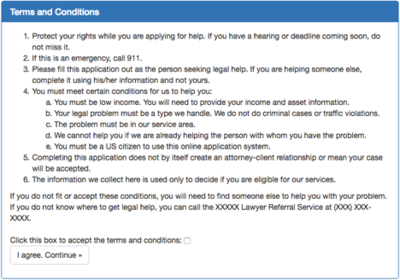

Figure 3 - Terms and Conditions Page
Application Process
From the main page, the applicant may choose to either (1) make a new application, or (2) check the status of an existing application:
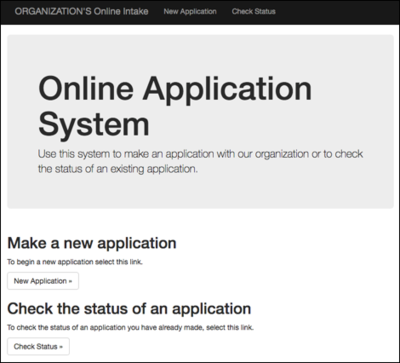

Figure 4 - Main Page Clicking the “New Application” button takes them to the Terms and Conditions page:
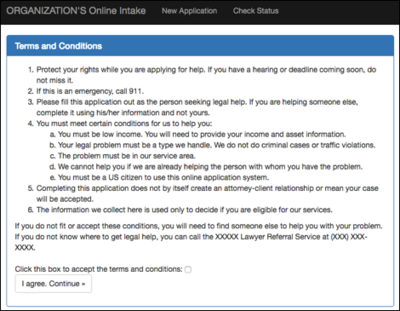

Figure 5 - Terms and Conditions Page Only after the applicant selects the checkbox, indicating they accept the terms and conditions, will they be allowed to proceed to the application. Pressing the “I agree…” button, without checking the box, results in a reminder that they have to accept the terms:

Figure 6 - "You must agree" warning The first page of the application is geared toward getting basic information about the person, including their citizenship status and the type of problem they have. If they mark that they aren’t a citizen, they won’t be allowed to continue on. Additionally, we can verify their problem in the organization’s service area. Various questions throughout the application process are required. Failure to enter information in those fields results in error messages next to the required item:
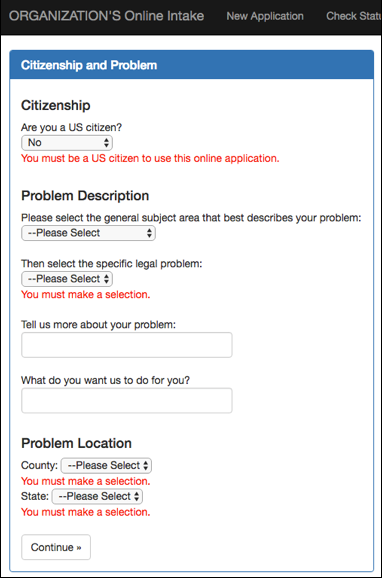

Figure 7 - Page One of the Application On page two, we get the name(s) of the applicant, contact information and a couple pieces of demographics. Contact information includes a mailing address, telephone numbers, and email address:
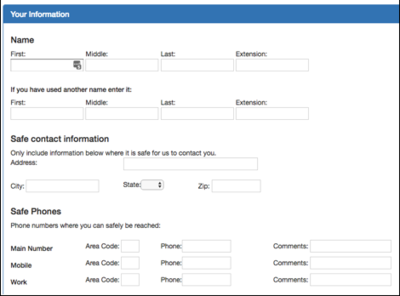

Figure 8 – A portion of Page Two of the Application Remember, the size of the browser the applicant is using determines the layout of the form itself. The portion of the same page two in a smaller screen is shown here:
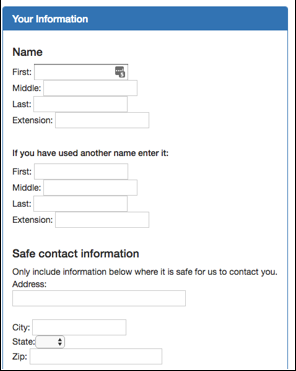

Figure 9 - Page two example in a smaller screen size On page three, we get conflict information from the applicant:
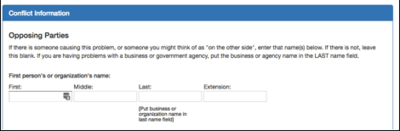

Figure 10 – A portion of page three of the application On page four, we get the information necessary to make an income and asset determination:
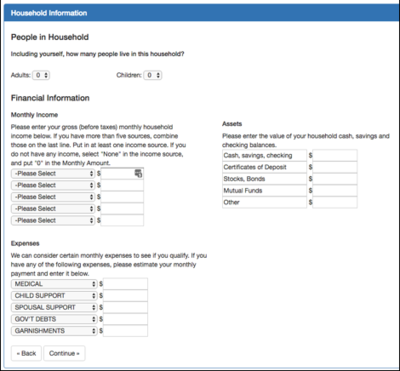

Figure 11 - Page Four - Household information At least one “Income” item must be filled out, even if they set the type to “None” and enter a zero in the amount box. All five asset boxes are required to have some amount entry in them. Like most parts of the system, these pages may be modified to omit various questions.
On the final page, we get a password from the applicant that they can use to log back on to the system to get the status of this application. We also get information about how they came to know about us:
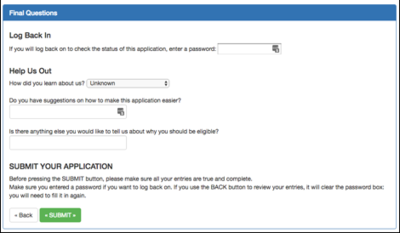

Figure 12 - Page five of the application Once the application is submitted, the applicant is shown an “Application Received” page, giving them various information about the application, including the application number they will need to log back in to get the status of their application, and the entries they made in the application:
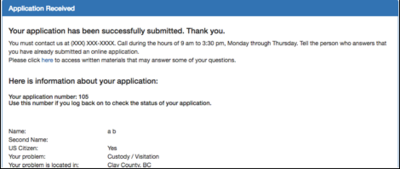

Figure 13 - Application Received page
Staff Portion of Online Screening System
Staff who have the appropriate role assigned to them in Prime, may use the Admin tab to open the Online Intake system:


Figure 14 - Top line menu bar showing the "Online Intake" option in the Admin tab
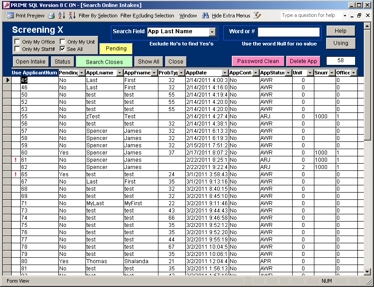

Figure 15 - Online Application Search Screen
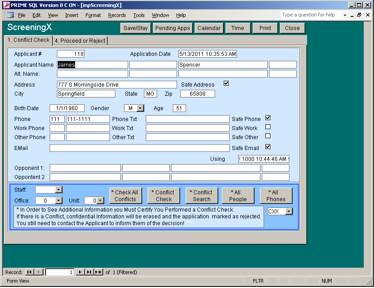

Figure 16 - Tab One
Only two tabs show initially. The other tabs hide information that might cause a conflict if seen.
Information entered by the applicant appears in light-blue boxes. Staff members enter information in dark-blue boxes to interact with the applicant's information.
At the bottom of tab 1, you can use the familiar conflict-checking systems to see if there is a conflict. If a conflict is found, a warning is given that information will be deleted, including information in tabs 2, 3 and 5. That helps protect against conflicts:

If you certify that there are no conflicts, the other tabs appear:

Tab 2 has their citizenship information, problem, problem location and other information:

Household information, income, assets, and expenses are shown on tab 3. Here you can also computer poverty percentages:

On tab 4 we decide whether to go on with the application process, require more information, or reject the application:

The yellow bar gives the applicant status information on the website. The "Application Status Text" allows us to give instructions or other information to the applicant through the website.
Let's say the status is "Holding for paperwork" (AHP) and that the applicant should send us his paperwork.
If the applicant logs back into the system, he would see that information:
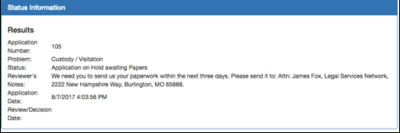

Figure 17 - Status Information Screen
Requirements
Prime 14 or Prime 16 is required for the Online Intake Version 16 System. For users hosted within Venture Technologies, all requirements are met and taken care of for you.
For self-hosted users, you must have:
- A system with SQL Server 2012, 2014, 2016, 2017, 2019 (or higher).
- Your Access version must be version 2013, 2016, 2019 (or higher).
- A Microsoft Windows Server 2016 (or higher) system with web services (web server-IIS), and items necessary to run an ASPX forms-based website must be installed, including such roles as .NET Framework 4.8 and ASP.NET 4.8.
- The SQL Server and web server must be on the same LAN.
- Visual Studio 2019 or Visual Studio 2022 (or higher) must be loaded on the web server and properly registered for use. The free Community version is acceptable.
(Other options you may wish to consider: SSL Certificate for encryption)